


These DIY aerosol can, pen and brush methods may not be for everyone, but I do receive a lot of questions about using spray cans. If you do not have a paint gun and you want to make a touch-up repair yourself, this may be an option for you to do at home.
Learn more or find your color code at www.CollisionBlast.com/ATU

How To Use Touch-Up Pen

Blending Explained

Automotive Touch Ups - Car Smarts to repair your vehicle!

How To Blend - Color Match

Body Filler

Bumper Repair

Peeling Clear Coat - Spoiler

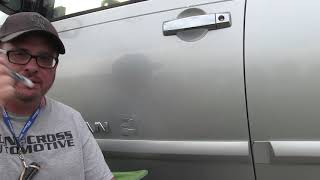
Door Molding Repair
-
How To Use Touch-Up Pen
Tips for using the touch-up paint pen. -
Blending Explained
Blending automotive paint is a techniques used to fade the new color into the original color to give you the illusion of a perfect color match. It is necessary to blend metallic and pearl colors in order to have a good match in most cases. -
Automotive Touch Ups - Car Smarts to repair your vehicle!
Is DIY car paint repair possible? Do you know how to fix car paint chips? Do you want to save money on your external car repairs? Well with Automotive Touch Up you can do just that. Lauren Fix brings you the latest Car Smarts video with information on DIY car paint damage repair with Automotive Touch Up -
How To Blend - Color Match
Use a blending technique to make an automotive paint repair look less obvious with a comparison to a car paint repair done incorrectly by masking off a small section. -
Body Filler
This video shows bondo body filler and spot putty techniques. We then refinish with some touch up paint. -
Bumper Repair
Scuffs are common on any bumper. Here we show how to spot repair a scuffed bumper using this Porsche Cayenne and our premium quality aerosol spray paint as an example. -
Peeling Clear Coat - Spoiler
Clearcoat was delaminating (flaking off) from this OEM red Ford ZX2 spoiler which is very common on older basecoat clearcoat paint jobs. Here we show how to repair it. Extra tip: try to remove all of the old clear. It didn\'t hold up to sunshine and water. Putting fresh paint over the chipped paint can make the old clearcoat wrinke up. -
Door Molding Repair
Repairing Honda Civic door trim using AutomotiveTouchup.com aerosol spray paint.
Lesson: Mastering Automotive Touch-Up – Pen, Bottle, or Aerosol: Blending Color Like a Pro
Objectives
By the end of this lesson, you will be able to:
- Locate your vehicle’s factory paint code using AutomotiveTouchup’s resources.
- Identify the three main touch-up paint formats and their ideal uses.
- Explain the essential preparation steps before applying touch-up paint.
- Apply correct techniques for each format—pen, brush-in-bottle, and aerosol—for a seamless blend.
- Recognize the importance of using a matched paint system for professional-looking results.
1. Introduction
Everyday life is a battlefield for your car’s paint. Tiny rock chips, door dings, and random scratches sneak in like uninvited guests at a barbecue—annoying and, if ignored, potentially destructive thanks to rust.
Luckily, you don’t need to be a pro painter to fight back. With the right touch-up format—spray can, pen, or bottle—you can restore your car’s finish, protect it from corrosion, and avoid that dreaded “Oh no, what happened here?” moment when someone notices the damage.
2. Find Your Vehicle’s Paint Code
Before you pick up a brush, can, or pen, you need the exact factory paint code for your vehicle.
- Visit www.CollisionBlast.com/ATU and use the “Find Your Paint Code” tool.
- Enter your year, make and model to determine paint code.
Pro Tip: Don’t guess based on color names like “Metallic Silver.” Different years and trims can have subtle but noticeable variations.
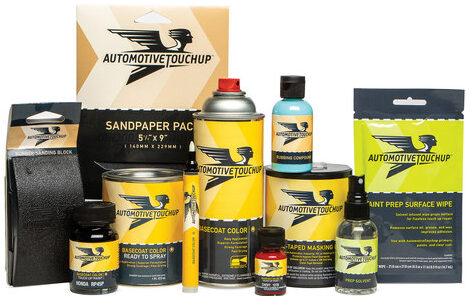
3. Choosing the Right Format
Available Options:
- Aerosol Spray (12 oz) – Best for larger areas; fan-shaped mist gives smooth blending.
- Touch-Up Pen – Ideal for thin scratches or precise work in tight spots.
- Brush-in-Bottle – Great for chips and small imperfections; allows dab application.
Rule of Thumb:
- Small & Precise = Pen
- Medium & Detailed = Brush-in-Bottle
- Larger & Blended = Aerosol
4. Preparation – The Foundation of a Great Finish
No matter the method, prep is king.
- Clean Thoroughly – Dish soap + water, then wipe with prep solvent and lint-free towel.
- Sand Carefully – 180-grit for rust and rough edges, 320-grit for smoothing.
- Dust Removal – Use a tack rag to make sure no grit remains.
5. Application Techniques
A. Brush-in-Bottle
- Primer (if needed): 2–3 light coats, 5–10 min apart.
- Dry 30 min, sand 600-grit, blend with 1,500-grit.
- Base coat: Shake well, apply light coats, 5–10 min apart.
- Tri-coat: Apply ground coat, then mid coat for pearl effect.
- Clear coat: 2–3 light coats, wait 10–20 min between.
- Cure overnight; buff next day. No wax for 1 month.
B. Aerosol Spray
- Best results: 70–80°F, humidity
- Mask off area, prime in light coats, sand after 30 min.
- Base coat: Medium coats, 5–10 min apart.
- Clear coat: 4–5 coats, 10+ min apart.
- Imperfections? Wet-sand next day (1,500–2,000 grit), polish.
- No wax for 30 days.
C. Touch-Up Pen
- Shake until ball rattles, depress tip to start paint flow.
- Primer: Light coats, 5–10 min apart, dry 30 min before sanding.
- Base coat: Light layers, 5+ min apart.
- Tri-coat: Base first, then mid coat.
- Clear coat pen: 2–3 coats, dab lightly, 10–20 min apart.
- Buff after 1 day.
6. Why AutomotiveTouchup Works
- Precision Color Matching – Factory-accurate colors.
- Complete System – Primer, base, clear are designed to work together.
- Tri-Coat Expertise – Step-by-step for depth and pearl effects.
Short Summary
Touch-up paint repairs can look professional—without the body shop price tag—if you follow these golden rules:
- Find your exact paint code before buying paint.
- Prep meticulously.
- Match the format to the job size.
- Apply primer, base, and clear in the correct sequence with patience.
Using AutomotiveTouchup’s matched system ensures a flawless color match, proper blending, and long-lasting protection against rust.
Review Quiz
1. Before you start any touch-up repair, what’s the first step?
A) Start sanding immediately
B) Find your vehicle’s paint code
C) Mask off the damaged area
2. Which touch-up format is best for fixing a long, thin scratch?
A) Aerosol spray
B) Touch-up pen
C) Brush-in-bottle
3. What grit sandpaper should you use to smooth primer before applying base coat?
A) 180-grit
B) 320-grit
C) 600-grit
4. True or False: You should wax the repaired area the next day for extra shine.
5. Why is it important to use primer before applying base coat on bare metal?
A) Makes the color shinier
B) Helps paint stick and prevents rust
C) Speeds up drying time