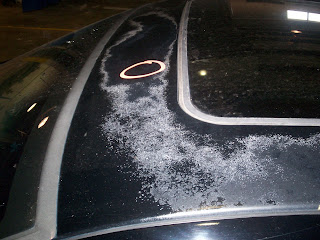
I saw in Kisa (Yes I named her. Hey, it’s not that weird) in march of 2005 at a small dealership in Wichita and knew that I had to have her. So even though I disliked the dealer I made the sale anyway and brought her home. I was a relative newbie around cars. I knew how to drive them and what kind it was by looking at it, but that was it. And so a 99 cavalier z24 became my very own. I’d love to say that I took very good care of her and we lived happily ever after, but being my daily driver and kept outside began to take its toll. Sun damage on the roof, spoiler and tip of the doors, bug chips in the hood, stress cracks in both bumper covers and even some metal damage below the fuel door, along with numerous dents and dings made her looks less than perfect to say the least.
I enrolled at Butler County Community College Spring of 2008 in the Auto Body Collision Repair Program to begin that fall. I began work on several small projects with my classmates, whatever Mr. Smith would assign to us to further our limited skill set. We were also told that eventually we could bring in our own cars to work on, and I began to dream of the day when my baby would be beautiful again. But that wouldn’t happen til September of the following year. So our second year of the program began in August with less than half the original students and we began mapping out which projects we would do in the course of the year. After discussing all aspects it was decided that mine would be done first. So beginning the next Monday I brought her in and buckled down for what I thought would be a couple weeks of work at most. Even though I wrote the estimate for a complete refinish I had no idea that it would take a complete 6 weeks of work.
The first step was identifying all the dents and dings that needed repair, and filed them down to metal. A stud nail gun was used on the larger dents, and heat and a body hammer were used on the smaller ones. Then we took out all head and tail lamps and rear bumper and left side skirt, so as not to damage these parts during repair. A 5”x2” piece was fabricated to fit below the fuel door, and finished with filler and glazing putty, and sanded. When we started on the left quarter right behind the door, we discovered about an inch of body filler(OEM recommendations calls for no more than ¼ inch of filler for safety reasons). In order to repair the low section there it all had to come off, and underneath all that filler were drilled holes just covered with filler. Mr. Smith explained that in the 70’s body sheet metal was stretched back to shape using screws drilled into the panel. Since the metal was already stretched from previous repair it was too thin to work any more. A 5”x9” section was cut out using a small cutoff wheel and a new sheet metal piece was fabricated to fit. For extra support we also cut backing plates for 3 of the sides to weld the section to and plug welded them to the sides of the hole. Then the new piece was welded using stitch welds and grinded smooth. In grinding off all the filler from that section more metal damage was discovered on the lower half and on the bottom edge so that section was cut out of the bottom of the quarter and a used part was sectioned in.
The entire front half of the quarter was covered in fiberglass for strength and then layered filler mixed with resin til it was finished. The major work being done, the bare spots were covered with putty and sanded, and the hood and bumpers were sanded and puttied, and we pulled her into the prep booth to begin masking for primer. At first a gray primer was spot sprayed over all the filler and sanded parts, guide coat applied and sanded. Lows were identified and more primer was applied. Ready for the final stages we pulled her into the paint booth and masked her of for a second time, more completely, edges and jambs, wiped her down and tacked her off. Then we mixed and sprayed 2 coats of black epoxy primer.
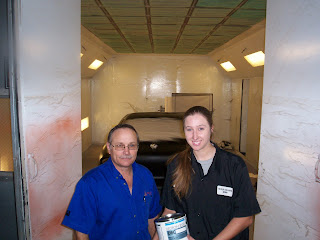
So up until this point I had designed a star, drawn it out and painted it on a test panel. It was a two tone design sort of 3-D, designed for the basecoat to show through. The method was much debated between Danny Hutchins our paint rep, Mr. Smith and myself. Mostly because the design was complicated in its simplicity and had no outline. I enlarged the design with a projector traced the main points of the star to transfer to the panel, and free handed the rest. I yielded to their professional judgment and opted to paint the doors and side skirts white, clear, mask off the white parts of the design, airbrush the basecoat colors on the panel, airbrush a pearl to the edges for clarity, clear again, unmask, and re-mask off the entire design and spray the whole thing with the basecoat and clearcoat. Danny was so generous as to donate the top of the line Brilliant Black Metallic Pearlcoat paint, and was thanked with smiles and brownies. Then we buffed the design, put her all back together(after a trip to o’Reilly’s to replace a busted foglamp bulb), and washed her off. Many many thanks to Mr. Smith for his patience and great help through the entire process, to Danny for his indescribable generosity, and through not great, for what little help my fellow classmates offered.
Over the 6 weeks, I learned a lot of patience, and determination. I learned that often there is more work than is first recognised, and that there is no better feeling than a job well done, especially when the it’s a girl’s first love.