Our Mustang Build
 So what got us started on out Mustang build? Well, I’ve been in the collision repair industry for over twenty years and have worked on restoration projects for other people, but not for myself. Except for when I was in high school. While in high school I painted 1979 Camaro. Next, I bought a 1974 Camaro. I overhauled the 350 motor, repaired minor dents, found interior parts at a wrecking yard that were in good shape, and painted it too. I worked everyday on this car during the two hours I was in high school auto class. It took me an entire year to complete the project, but what I learned and the satisfaction I received from the effort is priceless.
Camaro or Mustang Build
 I’ve been talking about Camaro’s so how did I end up with a Mustang Rebuild? All right, I backtracked a little talking about my high school days. After high school, I attended WyoTech and entered the collision repair industry. However, personal projects, such as my Camaro’s or Mustang’s came to an end. That is, until now! You see, my twin boys were getting older and I wanted a father and son project for them. We started looking around and found this Mustang. My wife being a Mustang fan and I’m a fan of about any project car, we bought it and made it our family project.
Time Flies
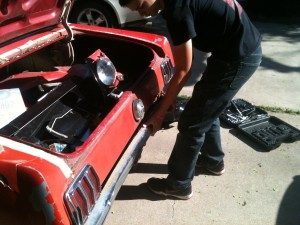 Days and years have past since we bought the Mustang, so you will see the boys grow up during this project. We started when they were 11 years old and now they’re 15. In my opinion, they are in their prime for this project and we’re going to jump in and stay busy until the project is completed.
Show Car or Road Car
We are not planning to build a show car ready to hit the SEMA car show. We just want to build a drivable road car that we can drive and enjoy. So if you have the same thing in mind and want to restore your Mustang as a driver from your home, then you should find this site useful.
More About The Builders
 This is a family project and we plan to build this at home with as many basic hand tools as possible. Why? So we can teach others who may be interested in a parent and child project, then you can learn how to do this at home too. I have years of experience in the collision repair industry and have taught collision repair for a college for eight years, but the DIY folks at home may not have all the tools that a professional body technician may have. Therefore, this website is dedicated to all the other DIY car enthusiast out there who don’t have the latest and greatest tools on the market. I encourage you to consider following this website, finding you a Mustang and restoring it your self.
In part 1, we’ll discuss the condition of the 1966 Mustang and one of the most common mistake made when getting a car ready for body repair or painting.
First Things First
Welcome to our first Mustang Build post. One of the most common mistake made when is not properly cleaning the car before starting the repairs. This does not seem like a big deal, but this can lead to many different problems that can be eliminated.
Over the years, the paint collects contaminates. Anything from the pollution in the environment to silicone in the products we use layer on top of the paint surface. Without properly removing these contaminates, we’ll just smear them into the paint finish as we do our bodywork or sand. The good news it that it is a simple process to remove the contaminates.
Washing The Car
The first thing that you need to do is wash the car, which will remove the contaminates and silicone. Some folks do not recommend using regular dish soap, but this has proven to do an excellent job for me and has not created an issue over the years. However, where you need to be careful, is when you select the dish soap to use. It should not have and special ingredient to help keep your hands soft or anything like that. This may add to the contamination problem rather than eliminate it. If you are not a fan of dish soap, car soap will work too. However, check it as well. You do not want one that claims it will not strip your car wax, as you do want to strip all traces of the wax of the paint finish. Some car soaps even have wax in them, which is what we are trying to remove, as wax is full of silicone.
We used regular dish soap as it strips the waxes and greases, which is the purpose of this pre-wash. Again, this step can save you many problems and headaches later down the repair process. If silicones are not completely removed, they may be smeared into the substrate and cause fisheyes during the painting process.
Wax and Grease Remover
After you have properly washed the car use wax and grease remover to assure all contaminates are removed from the project car.
Simple, But Crucial
I know it may seem ridiculous to write an entire article on washing the car first. However, it you will perform this simple task, you will eliminate one of the most common mistake made when performing auto body and paint repair.
Below are several videos discussing the project and demonstrating the steps to take when washing a car before beginning repairs.
About The Mustang
- Step 1: Rinse the car to remove much of the dirt before washing. Rinse from top to bottom.
- Step 2: Wash the car using soap and a mitt from top to bottom.
- Step 3: Re-rinse the car to remove the soap from top to bottom.
- Step 4: Use wax and grease remover to assure all traces of contaminates are removed from the car.
In part 2, we’ll show you how to remove the fenders on the 66 Mustang and how to store your hardware.
Remove Front Fender

We removed from front fenders to clean-up and repaired anything that may be damaged or rusted underneath the fenders. As mentioned, our front end parts were already removed. With those parts removed, the fender has eleven 1/2 inch bolts that will need to be removed. Once these bolts are removed, the fender can be taken off of the car.
The Hidden Location

There is one bolt location I want to mention that confused us. I guess someone removed this bolt at some point and never screwed it back in. Therefore, the video for fender removal we made does not mention this, as it wasn’t there. However, when we got the the other side, we found another bolt that you have to remove from the inside of the car. To get to the bolt you will need to remove the kicker panel from inside the car. There is a rubber plug. Remove the plug and you will have an access hole, which makes it easy to use a ratchet with an extension and a 1/2 inch socket to go through the access hole to remove the nut.

Tip – When removing or replacing nuts or blots in tight spots or access holes, place a piece of masking tape on the top of your socket opening. When the bolt is pushed into the socket, it will form a tight fit to eliminate the bolt from falling out and getting lost.
Hood
This would also be a good time to remove the hood if we were doing this in a garage. However, since it’s an outside project, we decided to leave the hood on for now. There is quite a bit of damage on the hood, so we’re going to replace it. These parts add up fast, so this job is going to have to sit at times throughout this build while we save money.
Bag and Label Your Nuts, Bolt, and Hardware
One of the most important steps is keeping your hardware and parts organized. Whether you are going to have a small job tore apart for several weeks or for several years as in our case. In fact, most restoration jobs are going to be tore apart for a long term basis.
This will make it much easier for you when you go to put it all back together. It’s also a good idea to store all parts, even if you are going to replace them. You never know when you may need the part for a reference or a clip or bolt that you for got to take off.
One way to do this is to get some zip lock bags and label one for each panel that you remove. Put all the hardware and small parts into the bag and label the bag accordingly. Another way is to screw the bolts back into the bolt hole after the part has been removed.
Removing Adjacent Parts
There may be time you will have to remove adjacent part to gain full access to the part you’re removing. On the 66 Mustang, we had to remove the rocker panel molding, to give us full access to the fender. Once the molding was removed, we removed the right front fender by using a 1/2 socket, 1/2 wrench, phillips screw driver, and the bags and marker to properly store the hardware.
Right Side or Left Side
Depending on which way your facing will determine which side is your right side and your left side. A easy way to remember the correct sides is to sit down in the car. While facing forward in the car, you’re right hand is towards the right side of the cr and your left hand is towards the left side. Another way to remember is the drivers side is the left side and the passenger side is the right side of the car.
Photos
We all have cell phones with photo capability these days. It is always a good idea to take a few pics along the way to use as a memory jogger when you go to put the parts back together.
First remove and adjacent parts, antenna, etc.
Step 1: Open hood and remove the six 1/2 inch bolts along the top of fender.
Step 2: With the front end and headlight parts removed, remove the two 1/2 inch blots in the front of the fender.
Step 3: Open door to access at the top.
Step 4: Remove kicker panel from inside the car. Remove rubber plug to access the 1/2 inch bolt.
Step 5: Remove the 1/2 inch bolt at bottom of fender.
Step 6: Place all bolts and hardware in plastic back and label the bag.
Step 7: Carefully remove the fender without scratching the door.
If you are replacing the fender, I recommend keeping the fender until the build is complete. You may need it for a reference, parts, etc.
Hooray….the fender is off! Now if you taking the other side off, just follow the same steps.
Now check out the boys as they demonstrate how to do this is the video tutorial they made.

Now that we have all of the silicone removed from the Mustang, we’ll start taking some of the parts off. When we bough the car it had been in a front end wreck. The front bumper, grille, and headlight parts were already removed from the car. Most of these parts are damaged, so we’ll have to find some new parts and replace them when we get to that point.
Part 3 – Inspecting The Front Drum Brakes and Shocks
In part 3, we give you a progress update on the Mustang. We’ll inspect the front brakes and shocks.
- This Mustang Restoration post is more about of a progress update rather than a how-to tutorial. With the front body parts removed, we thought it would be a good time to inspect the brakes and shocks.
With all of the good intentions to buckle down, save money, and set aside time, I haven’t done a very good job at that lately. I’m sure you know how it is. Things come up, we spend our money and life tends to shift into fast forward leaving little time.
I guess I could blab all day trying to justify why we haven’t worked on the Mustang for awhile, but I’m going to shut-up tell you about the next few steps we took.
We already have the front body panel removed, so I thought we’d check out the brakes to see what kind of shape they are in. I was assuming they would be thin and the drums may need to turned or replaced.
Removing The Tires and Wheels
I’d love to add disc brakes, but we’ll just get these working for now. Maybe later down the build. Anyway, to check the brakes, we had to take the front tires and wheels off the car. First loosen the lugs so the weight of the car holds the wheel in place. Once loose, we jacked the car up and placed jack stands underneath the car. I also had some blocks of wood as a backup, as we were not on cement. Be certain to never rush through and skip securing the car. There have been many people seriously injured and killed due to the jack slipping. It only takes a minute, but may save your life.
Once the tires and wheels were off the ground, we removed the lug nuts and took the tires and wheels off. Now you should have a good view and access to inspect the brakes and shocks.
Removing The Drum Brakes
Once the front-end was on secured on jack stands, we removed the shocks and brakes to inspect them. To my surprise they were in good shape. Therefore, we did not replace anything at this time. We decided to clean everything real good and put it all back together for now. However, I’m tempted to go ahead and replace everything later during the build. If we do, we’ll post a better video and article with the step-by-step procedure and pics for you.
We do have a quick video for you, but keep in mind, this is more of a progress report. Watch the video below.
Pics

In part 4, we are going to show you a method for finding dents to assure dents are not missed before painting.
 Photo Taken at Starbird Car Show
The last thing you want is to get your car restored and paint it to find you missed a few dents. This happens often, but we’ll show you how we are eliminating this from happening to us on our 1966 Mustang restoration project.
Body Repair
We have the front fender off, inspected the front shocks and brakes, now we are going to do some minor body repair. We are going to do one panel at a time. Breaking a big job into smaller jobs helps make the project more manageable. So the first panel we decided to work on was the trunk lid. I may refer to this panel as the deck lid in the video, but it’s the same thing.
Dull Paint Finish
Dents show up easy on glossy paint jobs, as the light reflects off the highs and lows making them easy to identify. However, on an older and dull paint job, it is very difficult to visually locate the minor dents. Not to worry, we’ll show you a way to help.
Protect Adjacent Panels

This method involves sanding so it is important to protect all of the adjacent panels, trim, or anything else you don’t want scratched. We’re going to be painting the entire car, but it’s still a good practice to follow.
One way to protect the adjacent panels is to lay several layers of tape on the adjacent panels. If you accidentally sand past and hit the tape, it will not scratch the paint surface. Another way is to lift the trunk lid or the panel you are working on so you can sand off the panel without sanding the other adjacent panels.
Block Cross Sand
 We’ve masked off the adjacent panels and now we are ready to start sanding. We used a long block with 220 grit sandpaper. It’s also important to sand using at a 30 degree angle. Cross sanding in both directions. In other words, sand in a 30 degree angle in one direction, then change directions and sand using a 30 degree angle. If I’m not making sense, you will understand what I am trying to say in the video, so be sure to watch it.
Highs and Lows
By cross sanding using a block, this will identify any lows are highs in the panel. Everywhere the block sanded even and level indicate the panel is dent free. However, areas where there are no sand marks indicate a low. If an area sands through faster that the rest of the panel indicates a high.
Extend The Life Of Sandpaper
Here is a little tip for you. Use a scuff pad to clean the surface of the sandpaper. This will extend the life of your sandpaper, which equals less money spent on supplies.
Mark Dent Locations
Once all of the panel dents were located, we used a paint pen to mark the locations. We also determined the extent of the damage and what repair method should be used.
Using PDR Tools – Metal Finishing
So what is the different between Paintless Dent Repair and Metal Finishing? PDR is the process of removing a dent without the need to repaint the panel. Metal finishing is the process of working the metal without the need to use body filler. However, metal finishing will require priming and painting the surface. So in my opinion, there is no need to spend hours trying to PRD a dent if the car is going to be painted.
With that said, we used PDR tools to raise the dent for metal finishing or enough to apply a thin coat of body filler or finish glaze. According to several body filler manufactures, the low must be 1/4 inch low or less for body filler and 1/8 inch or less for glaze.
We did not get to use body filler or glaze during this part of the mustang restoration tutorial, but we’ll get there and we’ll give you the process in more detail when we do.
Using A Body File
When working with metal, you will need to check your progress to determine the extent of the damage. A body file can be used to help by shaving the top surface. This will help identify how low the remaining portion of the dent is. If all of the metal shaves off even and there are no low areas, you will not need to apply any type of filler. Simply prime, block sand and you’re ready for paint.
We’ll get more into the repair stages later, but this help you find all of the dents so you do not miss any before painting.
Thanks for stopping by and watching the progress we make during this Mustang build. Hopefully, this will help or encourage you to start or continue your own project car for yourself or as a parent and child project.
Here is the video we made for these steps. Check it out below!
Step-By-Step Mustang Restoration Tips
1. Determine which panel you are going to concentrate on. Working on one panel at a time helps you focus on each panel and breaks the job into smaller and manageable tasks.
2. Clean the panel with soap and water.
3. Clean the panel with wax and grease remover to assure all contaminate are removed from the panel.
4. Protect adjacent panels by using masking tape, raising panel so adjacent panels will not be damaged, or removing the panel being worked on.
5. Using a long block with 220 to 320 grit sandpaper, cross sand the entire panel using even sanding strokes.
6. Clean surface to identify low and high areas.
7. Mark damaged areas and determine a repair method.
8. Repair damage with preferred repair method.
In part 5, we are going to demonstrate a metal finishing dent repair method using a propane torch.
- In this Mustang restoration tutorial, I am going to show you an old trick I learn years ago for repairing small dents. This method is not a paintless dent repair method, but a method to repair the metal without the use of body filler. However, the surface will have to be primed, blocked and painted.
If you have been in the collision industry for many years, than this is nothing new. I have used and I have seen many other guys use this method to repair small dents, such as hail damage. However, if the car you are working on has thin metal, this may not work well.
If you have a oxy/acetylene torch with a welding tip, I would recommend using that. It works much better than the propane torch I am using in this tutorial. However, I am always looking for alternative ways to repair cars for the DIY car enthusiast who may not have all of the tools needed. If you don’t have a oxy/acetylene torch, then you can buy one of these propane torches fairly cheap. I bought this one at ACE Hardware, but I you can get them at Walmart or many other places.
Let’s Get Started
We have the dents located and marked, now it’s time to repair them. To use this method, apply the heat outside of the dent and move inward towards the dent in a spiral direction. You will see the metal start to expand from the heat. When you see this, chase the expanded metal to the lowest part of the dent, which will cause the dent to raise. When the metal is hot, use a body hammer to lightly tap down on the center of the high area to help level and spread the molecules in the metal. The metal will still be slightly high at this point. Next, use a body file to level the metal. This will help you identify any highs or lows the metal may have. If there is still a low area, repeat the process to help raise the remaining low out.
Usually this method will work on the first attempt for hail damage. More stubborn dents may require several attempts to remove all of the dent. However, if there is a small low or imperfection, you can apply a small amount of body filler to complete the repair.
Warning: If the dent is not cooperating or starts to sink (move the wrong direction) stop and use a different method to repair this particular dent. You may be able to use a dolly to push up as you heat the metal, but you also need to know when to quit and use a different repair method.
If you have never tried this method, I recommend finding a junk part and practicing before attempting to do this on your restoration project. It takes practice and this will give you the opportunity to see how the metal moves around with the heat.
If you are afraid to try this method, don’t worry. During this Mustang restoration project, we’ll be demonstrating several different ways to repair dents.
Be sure to watch our video that demonstrates the steps in detail for using this method below.
In part 6, we are going to start removing the quarter panel from the mustang.
- In the last few videos, we demonstrated how to identify dents and a method of how to repair them on our 66 Mustang restoration project. We are going to cover more dent repair later, but in the next several posts, we are going to replace the right quarter panel.
In this tutorial I am going to show you how to replace a quarter panel on the 1966 Ford Mustang. The quarter panel on the Mustang is rusted out as many older cars do.
Quarter panels are welded on panels that may be required to replace if involved in an accident or if rusted severely as with the Mustang we’re working on. Weld- on panels require drilling spot welds. Before you start cutting and drilling, you will need to remove the necessary parts to prevent from damaging then or to access the spot weld locations.
Since this was rusted, we will not need to repair the quarter panel before we beginning. If the quarter panel had damage caused by a collision it would be necessary to first straighten straighten the quarter panel to realign the structure to realign all the body gaps.
The first thing you want to do as with any part is check the part to make sure that you have the correct part. Many times the wrong part may have been ordered or the wrong part was shipped. This is not something you want to realize after you have removed the part. It only takes a second set it up to the car to assure you have the correct panel. Next remove any parts necessary to access the spot welds. Below are the first steps to take when replacing the quarter panel:
Step 1: Remove Rear Bumper
To locate the bolts holding the bumper on open the trunk lid and locate two 5/8” blots one each side inside the trunk area. Once the four bolts are removed the bumper is ready to take off the Mustang.
Step 2: Remove Taillight Assembly
From inside the trunk area locate four 3/8 inch bolts. Remove the four bolts, unplug the taillamp plug and remove the taillamp assembly.
Step 3: Remove Quarter Panel Extension
From inside the trunk area locate three 7/16 inch bolts holding the extension filler on. Remove the bolts and then remove the extension filler.
Step 4: Remove Interior Parts
Quarter panel interior panels may need to be removed to access spot welds, to prevent damaging, or from drilling through the interior when drilling spot welds. However, on this Mustang, the spot weld locations are not near the interior trim panel. We decided to go ahead and remove the interior trim, as we will be restoring the inside as well.
Step 5: Remove Back Glass Trim
Using a glass trim removal tool, we removed the trim will need to be removed to prevent damaging it.
Summary
We removed the back bumper, taillamp assembly, quarter panel extension filler panel, quarter panel trim, and the back glass trim. Now we’re ready to start drilling spot welds. We’ll cover the steps in the next Mustang restoration video tutorial.
In part 7, we demonstrate the steps to drill out spot welds using a cordless drill and a seam buster.
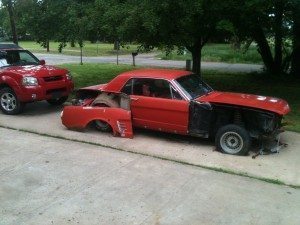
Align Panels
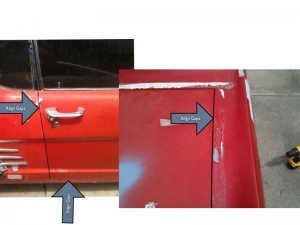
In this tutorial we are going to take the quarter paneloff of a 1966 Mustang. First, we need to align the adjacent panels to the quarter panel so the new quarter panel will fit properly when installed. If you don’t First align the door and the deck lid to the quarter panel you will have problems when trying to align the quarter panel. To align the door loosen up the hinge blots and adjust as needed to properly align the door to quarter panel gaps. Next loosen the bolts holding the deck lid in place to make necessary adjustments to align the deck lid to quarter panel.
If Damaged, Repair The Damage
If the quarter panel is damaged, obviously, it’s not going to fit or aligned properly. Therefore, you must rough out the damage in order to assure the body lines align and the new quarter panel will fit correctly. Once the damage is straightened and the gaps are aligned properly you can begin removing the quarter panel. To start removing the quarter panel you will need to use a drill to drill out the spot welds. We’re doing this project as a DIY project at our house as you may be. Therefore, we are using basic tools which will allow you to do this from home as well.
Finding The Spot Welds
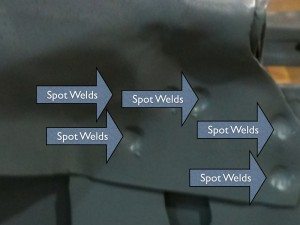
Spot welds are easy to identify. They are a small dimple in the metal. However, there may be locations where seam sealer or other coating are covering them up. If there is seam sealer of other coating, it must be cleaned of before locating the spot weld location. A wire brush, sanding, or scraping will help remove the coating from the area. Once cleaned, the spot welds can be located.
Properly Using A Drill When Drilling Metal
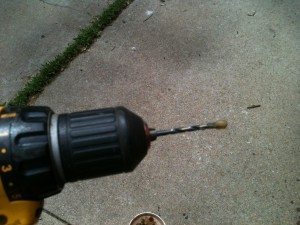
Any type of drill will work but in this tutorial we’re simply using a cordless drill. The trick to drilling metal, is using good quality drill bits, drilling at a slow RPM, and using a lubricant jell or spray. Not using high-quality drill bits, drilling with too high of a speed, or not using a lubricant will lead to burning and dulling the drill bit, which makes it difficult and time consuming to when drilling metal. There are other methods for removing spot welds, but most of them require an air compressor.
Drill Through Both Panels
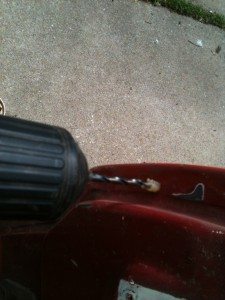
Using a 9/64 drill bit, drill through the center of the spot welds. If you have a problem with the drill walking on or moving around it may be wise to use a center punch and hammer to tap a small indention in the center of the spot weld location . Drill both panels with the smaller 9/64 drill bit.
Drill Through Outer Panel
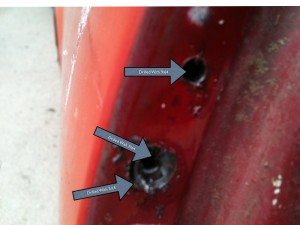
After the small hole has been drilled a larger bit 5/16 can be used to drill out the spot weld. When using the bigger bit, you only want to drill through the outside panel.
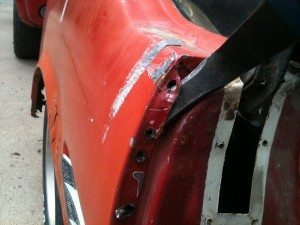
Once all spot welds have been drill, use a seam buster to separate the panels. This is done by hammering the chisel edge of the seam busterbetween the panels.
Making A Rough Cut At Section Location
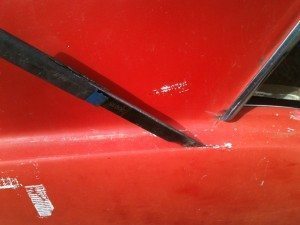
The Seam Buster also comes in useful when making rough cuts as we did on this Mustang project. Now that the quarter panel is off, you can start preparing the vehicle for the new quarter panel. However, we are going to have to do additional work before continuing this quarter panel replacement due to the rusted wheelhouse on the Mustang.
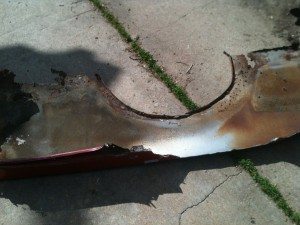
Step 1: Remove Rear Bumper Extensions – To remove extensions use a 1/2 socket to remove the right and left bolt holding the top of the extensions on. The top bolts can be accessed from inside the trunk area. The lower bolts will need to be access from underneath the car.
Step 2: Remove Rear Roll Pan – The roll pan will need to be removed to gain access to the spot welds on the back of the quarter panel. Using a phillips screwdriver unscrew the roll pan from the rear body panel.
Step 3: Punch An Indention in Center of Spot Welds – To prevent the drill bit from moving, use a center punch and hammer to make an indention in center of spot welds location.
Step 4: Drill Through Both Panels at Spot Welds Locations – Using a 9/64 drill bit, drill in the center of each spot weld location. Drill through both panels, but care should be taken not to drill though interior parts or anything that may be damaged on the other side. This may require removal of interior parts.
Step 5: Drill Through Outside Panel – Using a 5/16 drill bit, drill though the outside panel only. This will remove the spot weld.
Step 6: Separate Panels Using a Seam Buster – Once you have drilled out all the spot welds a Seam Buster can be used to separate the outer panel from the inner panel. Step
7: Make Rough Cuts Using Seam Buster – Using the Seam Buster, make a rough cut at section location. Be sure that you leave yourself extra metal so the final cut can be made later when installing the new quarter panel.
Step 8: Remove Quarter Panel– Now simply remove the old panel from the Mustang. Gloves should be worn to protect yourself from sharp edges from the rough cut and spot weld locations.
In part 8, We’re going to remove the rear quarter glass and the outer wheelhouse using basic hand tools.
In part 9, we straighten and clean-up the flanges and test fit the outer wheelhouse to assure proper fit.

We finally got the outer wheelhouse removed on our Mustang restoration project and now we’re ready to clean up the flanges to install the new part.
While removing the wheelhouse, there were areas that were not drilled as good as they should have been. This may be due to not drilling in the center of the spot weld, or an area we did not have access to. In these areas we used the seam buster to break it loose. However, the metal ripped in a few areas, a few weld nuggets or a chunk of metal from the old wheelhouse were still attached in other areas. So now it is time for clean-up.
Hammer and Dolly Work

Using a hammer and dolly, we straighten the bent or damaged areas by placing the dolly on the backside of the flange and tapping on the front side of the flange with a body hammer. You should not be concerned about getting it perfectly straightened at this point, as this will make it difficult when installing the new wheelhouse. Just get it the basic shape so a grinder can be used to grind the nuggets and to clean up the flange. A chisel, pliers or vise grips can be used to remove or wiggle some of the metal pieces that were left on the car. If there are small pieces of metal still remaining that are difficult to remove, simply grind it smooth using a grinder (or a drill can be used) with 36 grit discs. However, care should be taken not to hold the grinder in one spot too long, as this will overheat the metal.


We semi-straightened the flanges with hammer and dolly, removed and remaining metal, and ground weld nuggets left behind. Now the flanges are smooth and ready to set the wheelhouse in place to see if it is going to fit correctly.
Test Fitting The Outer Wheelhouse

Once all of the flanges are semi-straightened, cleaned up, and ground smooth, set the new outer wheelhouse in place to check fit. You may have to bend or tweak the flanges a little to allow access for the outer wheelhouse to slide into place.
Cutting To Fit

I’m not sure why, but on this particular project, we had to trim the front lower edge of the new wheelhouse in order for it to fit properly. This may be required at times when using aftermarket parts, but you want to assure the wheelhouse fits correctly. If not, the quarter panel is not going to fit, which is not something you want to happen to you.

Limited Access Areas

Another area of difficulty we had on this Mustang was fitting the wheelhouse between the brace that is in the center. The wheelhouse must slide behind this part, which has limited access. It is also hard to grind and cleanup the area behind the brace. But with a little time and several temper tantrums, we managed to get it.
It’s Just A Test…..Do Not Weld
 Do not start welding at this point, as we will need to take it back off and do more clean-up, straightening, corrosion protection, and another test fit before final installation. Yes, weld-on panels can be time consuming, but you do not want to weld a part on to discover something is a little misaligned later. If the wheelhouse does not fit correctly, the quarter panel is not going to either.
Step-By-Step
- With outer wheelhouse removed, reshape flanges using hammer and dolly.
- Using vice-grips wiggle and remaining metal pieces left on the car.
- Using a grinder with 36 grit, grind all weld nuggets or any other rough areas.
- Clean up remaining portions of flanges using a grinder with 36 grit to prepare the flange for outer wheelhouse installation.
- Set outer wheelhouse in place to check fit.
- Make any modification need to new part so the part will fit properly.
- If modifications were made, re-check fit to assure proper fit.
If you like this tutorial, please share it with your twitter and facebook friends. Perhaps they will find it useful for their restoration project. Simply click the button below!
In Part 10, we will treat rusted metal and melt lead to drill spot welds at section location.
Removing Rust
 We have the wheelhouse removed, now we need to eliminate all of the remaining parts before installing the new outer wheelhouse. The first step we took as to use a 3 inch 50 grit grinding disc to remove some of the rust.

Once we removed as much of the rusts we could with the 50 grit, we used a 3 inch scuff pad. The roloc scuff pad will continue removing rust without the risk of thinning the metal.
Next, we used a wire brush. The brush is able to get into some of the crevices to remove rust that was left behind. Sandblasting would be the best option to remove all of the rust, but we are not equipped to sandblast. That is why we are taking every step possible to remove the rust.

The last step we took to remove as much of the rust was to use a scuff pad by hand. I know this seems like a lot of steps, but rust is not our friend and we want to do all we can to remove it. The rust treatment says that it can be applied over rust, but I would like to remove as much as possible.
Section Location
Before we apply the rust treatment, we are going to make our cut for the section location. However, I found that this area is the original section location from the factory. If I had known that, I would have melted the lead and drilled the spot welds the first time. Well, have another quarter to replace on this car, so I will know ahead of time on that one.
We used a propane torch to melt the lead to reveal the spot welds. Once we heated up the lead, we used a wire brush to clean the lead off. Be sure to melt the lead and not to grind it as the lead is harmful to breath. Now that the spot welds are revealed, we drilled them out, which allowed us to separate the panels.

Once we we melted all the lead of the factory seam, the spot welds were easy to locate.
After locating the factory spot welds, we used a drill to drill them out. Again, we used the same method as before. We used a center punch to indent the center of the spot weld, drilled using a 9/64 inch bit, followed by a 5/16 bit.

Now we started separating the panels using a seam buster chisel. An air hammer can also be used, but if you do not have an air compressor, the seam buster will work fine and cause less damage.

I did find a few spots that were spot welded with brass. To remove the tack welds, I used a grinder.

Here we used rubbing alcohol to clean the metal and surrounding areas before we apply the rust treatment.

Now we’re ready to apply the rust treatment. This will destroy any remaining rust and prevent any new rust. This should be applied with several light coats.
Prime and Paint
Once applied the treatment must dry for 24 hours before priming and painting, which we will do in the next part.
Step-By-Step
- Remove rust using 50 grit disc
- Remove rust using roloc scuff pad
- Remove rust using a wire brush
- Remove rust and scuff surface using scuff pad by hand
- Melt lead at factory section using torch – (Next time, I will do this when removing the quarter)
- Drill section location spot welds
- Grind brass tack welds
- Separate panels using a seam buster
- Prepare and clean surface for rust treatment using alcohol
- Apply two thin coats of rust treatment

- In the last mustang restoration video, we removed as much of the rust from the inner structure as possible, and then we applied rust treatment to the surface to destroy any remaining rust. This video is going to demonstrate how to prime and paint the inner structure for your home using spray cans.


After allowing the rust treatment dry for 24 hours, I applied several coats of self etch primer to further protect the metal before painting. Self etch primer is an acid base primer that should be applied over bare metal to eliminate corrosion protection.
We allowed the self etch primer dry for 30 minutes, then applied some satin enamel outdoor spray paint we purchased from ACE hardware. Some of this paint will be removed when we weld the outer wheelhouse on, but I want all of the areas to be coated that we will not be able to get to again once we start installing the parts. When we have the wheelhouse welded on, we’re going to coat everything we can get to one more time, but we’ll talk more about that later.
You are not going to ever see most of the structure we treated, primed and painted, but to kill the rust and knowing it’s painted gave us peace of mind. We are wanted to do everything possible to prevent rust using only techniques that you can use at your house with minimal tools and equipment.
Next, we’ll start test fitting the outer wheelhouse on the mustang restoration project so we can get it welded on.

Before we can continue with the outer wheelhouse replacement, we have more rust to deal with. The rear lower filler panel is rusted and will need to be cut out.
Once the rusted panel was cut off, we used the old part to fabricate a new one. We laid the part on a flat sheet of metal and outlined the metal using a marker. Then we cut along the mark to make the new piece.
Now we have the old part cut off and the new part ready to install.
1. Determine where rusted part needs to be cut and mark. Masking tape can also be used as your cut line.
2. Use a tool to cut the part. I used a grinder, but a cut-off saw or reciprocating can also be used.
3. Use the old part as a template. Lay the part on a flat sheet of metal and mark cut lines.
4. Cut the cut lines using a cut-off saw, reciprocating saw, or metal snips. (Note: a grinder may not make precise enough cuts for this step.)
Pics

This is a quick video tutorial to demonstrate how to remove the deck lid or trunk lid on a 1966 Mustang Coupe.


