• Skip to primary navigation
  • Skip to content

Collision Blast

Providing FREE Auto Body and Paint Training Videos

  • Home
  • Auto Body & Paint Supplies
    • Auto Paint Supplies
    • Restoration Tools and Supplies
    • POR 15 Supplies
    • Touch-up Paint
    • Wiper Blades
    • SunMight Sandpaper
    • Oil & Air Filters
  • Lessons, Projects…
  • Blog

Tips You Need To Know Before Painting Your Car

October 31, 2013 by admin 2 Comments


I know it’s exciting to have a new project car to repair and paint, but before you start working on it, here are a few tips for you to consider.  You are going to have a lot of time, hard work, and money involved with the project.  So I am assuming you want the best results possible.

[youtube]http://www.youtube.com/watch?v=7eMgENm2rhc[/youtube]

Even when taking every precaution and following all of the steps, things still come up or go wrong at times.  Therefore, I believe we should try to eliminate as many possible problems as possible.  By following the steps in the video before you start the actual work, you may be able to bypass some of the problems that arise later.

This is the 1st episode of a series of videos we are doing for the Eastwood Video Series.  During this series of videos, we are going to go through the entire process of painting a car.  You can catch upcoming episodes by visiting www.CollisionBlast.com/Eastwood

Filed Under: Auto Body and Paint Videos, How To Paint Cars Tagged With: how to paint a car

Auto Paint Shop Tips For Masking Moldings For An Awesome Car Paint Job

November 28, 2012 by admin 1 Comment


[youtube]http://www.youtube.com/watch?v=lU0qw1-IkNg[/youtube]


An awesome paint job on a Toyota Supra.

An awesome paint job on a Toyota Supra. (Photo credit: Wikipedia)

An auto paint shop may have different methods to mask molding to prevent bridging.  This is a problem due to the molding fitting tight against or even touches the painted surface.  The problem with this is that the clear coat may fill in the gap or crack between the molding and paint surface.  In other words, the clear coat bridges over from the painted surface to the masking tape.  When the paint is dried and the masking tape is removed, the clear coat will have a rough edge from the clear coat.  A nightmare a paint shop may have after spraying the car in the paint booth is pulling a chunk of clear coat from the painted surface.  If this happens, the surface may have to be sanded, re-painted, and cleared, which cost the body shop more auto body supplies.  With the costs to paint a car, this is something you do not want to happen to you.  

.

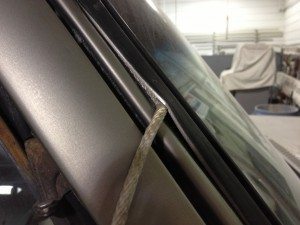
There are several ways an auto paint shop can avoid this.  If the glass molding is soft and flexible enough a small diameter rope can be used to shove under the molding.  This will lift the edge of the molding up, which will allow the paint coating to flow underneath the molding.  Once the paint is dry, remove the rope, which will allow the molding edge to lay back on top of the newly painted car paint job.

.

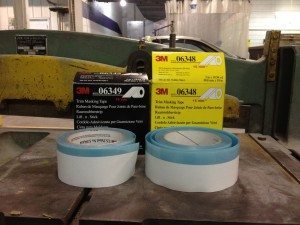
There is also a special masking product, which has a hard plastic edge on one end and adhesive tape on the other end.  First place the hard plastic edge underneath the edge of molding.  Then fold the adhesive side over and stick to the glass.  This will lift the edge of the molding up, which will allow paint coatings to flow underneath the moding.  When the trim mask is removed, the edge of the molding will set back on top of the newly painted car paint job.  This is nothing new to the auto paint shop, but it is a good product to consider is you have not been using it.

Sometimes the molding is too rigid and the molding is difficult to lift.  In these cases, there is another method that can be used.  When outline the molding with ¾ inch masking tape, leave about ⅛ inch of the molding exposed.  Then mask the glass as you normally would using masking paper.  Once completely masked, use ¼  inch fine line tape to go around the edge of the molding.  This tape will cover the the molding edge and the masking tape that was used to outline the molding.  It is important to apply the 1/4 inch tape last so it will be easy to pull off.  Immediately after applying the last coat of clear coat, pull the ¼ inch tape from the molding.  Care needs to be taken not to let the tape hit the fresh clear coat finish.  This will produce a smooth transition instead of creating a hard edge if removed after the clear has dries.  This will also eliminate the risk of pulling a chunk of clear from the painted surface.  An auto paint shop probably already uses this method to reduce hard edges, but another tip for you to consider. 

An awesome car paint job depends on how well you prepped the car.  Improper masking is one of the easiest ways to notice a car has been painting.  So take your time when prepping and masking to produce the perfect car paint job you are wishing for. 

If you like this article, please subscribe to us at CollisionBlast.com   If you have already subscribed, be a resource and share it with a friend.  

Filed Under: Body and Paint, Collision Repair Training, How To Paint Cars Tagged With: auto paint shop, car paint job, paint booth, paint shop

How To Set The Fan Pattern on a Spray Gun

September 11, 2012 by Donnie Leave a Comment

The fan pattern adjustment sets the width on the spray pattern.  By turing the fan adjustment to the right (clockwise) the fan with be small.  By turing the fan adjustment to the left (counter clockwise) the fan will be wider.

Depending on what is being sprayed will determine the width of pattern needed.  For example, if you are spraying a small primer spot, a smaller pattern can be used to eliminate primer from going all over the panel being primed and adjacent panels.  On the other hand, if you are spraying base coat on a full panel, a wide fan pattern will provide good results.

In the video, I will further discuss the advantages of different fan widths, application tips, and where to find the fan pattern adjustment on a spray gun.


Filed Under: Auto Body and Paint Videos, Collision Repair Training, How To Paint Cars, Tips Tricks Advice Tagged With: fan pattern, spray gun

What Is A Tri Coat and What Is The Difference Between Candy Paint and Tinted Clear

July 27, 2012 by admin Leave a Comment

I have had several questions on my YouTube channel about candy paint, tinted clears, pearls and tri coats.  So here is a quick video explaining and demonstrating this.

[youtube]http://www.youtube.com/watch?v=eJBPQ_h8s3o[/youtube]

Here is a little information not in the video.

Opaque – Not transparent or translucent; impenetrable to light; not allowing light to pass through.  The base coat is opaque, which hides everything underneath.  Therefore, base coat should be applied until full hiding is achieved.

Translucent: permitting light to pass through but diffusing it so that persons, objects, etc.  Mid coats (candy, pearl, tinted clear) are translucent, which change the appearance of the color, but do not fully cover the base coat.  Depending on the color of the base coat and/or the number of coats of mid coat applied with determine the color.

Transparent: having the property of transmitting rays of light through itssubstance so that bodies situated beyond or behind can be distinctly seen.  Clear coat is transparent, which does not change the appearance of the color.  Clear coat is applied to provide UV protection and a glossy finish.

Candy or Tinted Clear: Basically the same thing.  A translucent color to produce depth and awesome colors.

One more thing, Jacob drew a new logo for me.  I took a photo of it and uploaded it, what do you think about it?


Thanks for visiting!  Please share this with your Twitter and Facebook friends!

Filed Under: Collision Repair Training, Custom Painting, How To Paint Cars, Tips Tricks Advice Tagged With: candy paint

Basic Steps To Prep Paint Before Spraying

July 24, 2012 by admin Leave a Comment

This video tutorial is a video overview for paint prep.

[youtube]http://www.youtube.com/watch?v=-DnfzvmZKgA[/youtube]

Learn how to prep paint including: cleaning, feather edging, primer, block sanding, final sanding, and everything else needed to properly prep a car before spraying.  If you are a DIY and would like a more detailed  step-by-step guide visit http://amzn.to/NO8Vzm

If you like this tutorial, please share with your facebook and twitter friends!

Filed Under: Auto Body and Paint Videos, Collision Repair Training, Featured, How To Paint Cars Tagged With: paint prep

  • Page 1
  • Page 2
  • Next Page »
  • Basic Training Course
  • Schools
  • Consumer
  • Interviews/Stories
  • Eastwood Series

Copyright © 2025 · Aspire Pro on Genesis Framework · WordPress · Log in