These lessons are now open to help collision repair students learn from home. I am lifting the Patron fee to access this content during this time, as many schools are closed. However, I do appreciate your support and hope my Patrons continue to support this website and training.
If you would like to help and support this website, then I would greatly appreciate it. For more information visit. www.Patreon.com/CarAddictGarage
Click Button Below For Lesson
I hope you enjoy this training lesson. Let me know if you have any questions, or suggestions you may have to make this training module a better learning experience for you. Donnie
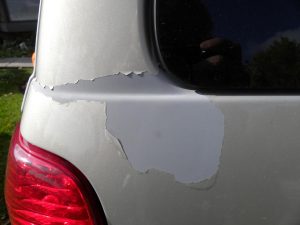
Lesson 12 – Paint Defects
You’re Going To Have Problems when Painting…The Key Is Knowing What To Do About It.
I mean, the general rule is if you’re not prepared to make a mistake,
you’re not going to make much progress.
– Maurice Wilkins
In this lesson you will learn about some of the most common paint defects and how to repair them. Some defects happen with age, such as rust, peeling, cracking. While others happen during the painting process, such as dirt in paint, runs, excessive orange peel.
This page is the full lesson, which includes text content, videos and resources. I also broke it down to only the videos and resources. Just click the button below if you prefer to view only the videos or resources. This page is the full lesson, which includes text content, videos and resources. I also broke it down to only the videos and resources. Just click the button below if you prefer to view only the videos or resources. Note: some browsers and mobile devices may not play videos below…but they should work on the videos page. If you are still having problems viewing videos, then you can watch the playlist on YouTube.
Video Overview
Currently do not have a video overview of this lesson. There are other videos below.
Paint Defects
We’ve covered repairing damage, priming and painting. However, the paint finish is not always ready to sand and shoot. There are many paint defects that may cause you to strip or partial strip the coating before refinishing. There are other paint defects that can occur during the paint and refinish process. This lesson is going to cover some of the defects and what to do about them.
The first thing that you want to do before ever starting any paint job is to properly clean the surface. This step is often overlooked, but leads to many of the problems caused in the refinish and painting process. This may result in adhesion problems, dirt in paint job and fisheyes. I like to use dish soap as it cuts the greases and silicones off the surface. Many car soaps are designed to wash the car without stripping the waxes. Next, wipe the repair area with wax and grease remover.
Inspect the paint surface to determine which method to use to prepare the surface for paint. If the paint is peeling, cracking, or too thick, you may need to strip some or all of the paint off of the surface. If the paint is in good condition, you will probably be safe final sanding the surface and re-spray. For more information about the inspecting process visit Lesson 3 – Developing a Repair Plan.
Lets examine the list of most common reasons that you may require you to strip or partial strip the paint surface. Peeling, micro-checking or cracking, bubbling, rust, and too thick.
Peeling
Video About Faded or Peeling Clear Coat
This is where the topcoat is peeling off the undercoating. This is due to a loss of adhesion. Painting over a surface in this condition may result in the new paint job to peel as well. The new paint job is only as good as the surface that it is applied to. Just like a building, the foundation is the most important part of the construction. There are different ways to strip the paint of the surface including, chemicals, sanding, and media blasting. I prefer to just use a DA and sand the surface with 36-80 grit. You will need to sand down past the surface that was peeling or strip to metal if needed. If it’s the clearcoat, make sure that all clearcoat is off of the panels that are peeling. If the top coating is peeling all the way down to the primer, make sure to sand all color down to the primer on the panel. This will assure that there will not be adhesion failure at a later time.
Note: If you are restoring a vehicle, stripping a complete vehicle or have rust, you may consider media blasting. Chemical stripping can be effective too, but new legal concerns are being addressed about the proper disposal of the waste.
Micro – Checking
This is tiny cracks in the paint. These cracks may be easy to see, or checking may be difficult to identify as well. You may need a magna fine glass to get a closer look at the surface. I have found that when a surface has this type of damage it is best to strip down all of the way to the metal. The tiny cracks are deep many times and will cause you problems if painted over. I have heard of technicians sanding the surface down and using a fill primer to fill the small cracks, but I certainly would not recommend that. I recommend stripping down to bare metal and follow the procedure as described in the peeling lesson for the refinish process. Epoxy, Primer Surfacer, Final Sand, Sealer, and Paint.
Too Thick
How To Determine Mil Thickness
Using a mil gauge will help you determine how much paint has been applied to the surface. If the coatings exceed 12 to 14 mills, it is recommended to strip or partial strip the surface. Just like a roof on a house, you can only put one or two layers of shingles on without having to remove them and start over. Usually the OEM paint or factory paint and one additional paint job, you will usually be close to the 12 mills range. So it is safe to assume that is the vehicle has ever been repainted you are getting close to the exceeded limit. Probably 3 paint jobs is a definite sign that stripping or partial stripping will be required. Remove enough of the coating until the paint mils measure 6 or 8 or less. A mil gauge will need to be used periodically to know when you have reach the required mil thickness. This will allow the new coating to be applied within the mil thickness recommendations and still leave the factory undercoatings. To use this method start DA Sanding out with 180 grit followed by 220, 320, and final sand with 500 grit. It is also a good idea to use an interface pad for this sanding method. Once final sanded, wash, mask, wax and grease remover, tack off, primer sealer, paint, and clear coat.
Chipping
Video About Feather Edging Paint
Chipping may be due to the top coat not having proper adhesion, the mil thickness not thick enough, or it may just be due to gravel. Even an OEM paint job from the factory will chip if hit by gravel at high speeds. The best way to repair chips is to feather edge them out. If the chip is into the primer, you will need to feather down to the primer. If the chip is into the metal, feather down to the metal. Once chips are feathered out, final sand with 500 and primer small metal areas with self etching primer. Then your ready to continue with the painting steps. There is another method that I have seen many times. If the chip is not down to the metal, sand with 180, fill with glaze putty (with razor blade) and block out. This is quicker than feather edging; however, if the chip is down to metal, feather edging is required to assure that all rust traces are sanded and properly treated.
Rust
No one ever wants to see rust, but cars and trucks do rust. You may not only have to strip, but you may also have to cut the rust out and add new metal. Usually rust started from the back side of a panel where mud and water get trapped. So by the time you see it….it’s already rusted through or about to. Although, it could be surface rust starting on the outside of a panel. For instance, the car was scratched and started rusting underneath the paint. If it is surface rust, then you may be able to sand the rust off and still have good metal.
An easy way to check if it is rusted through or not is to push in on the rust bubble with a screwdriver to see if it pushes through or not. Either way, rust will require the surface to be sanded to bare metal.
Methods To Strip Paint To Bare Metal
We have reviewed some of the reasons that will require additional steps before painting. Now we are going to review some of the problems that can go wrong during the painting process.
Dirt
I’m sure with all of the cleaning procedures that I have mentioned, that dirt is your enemy in the painting world. This is dirt that can come from your paint booth, the car, or even your self. We’ve emphasized to get the car clean, but you also need to make sure the booth is clean. If you do not have a downdraft booth, you may need to wet the floor to keep the dust down. Make sure your hoses are clean. You must also think of yourself. Are your clothes clean or do they have lint on them. You also want to have your arms covered, as you don’t want hair in the paint job, which has happened many times. Even following all of the cleaning steps can not promise a dirt free job. If there is dirt during the sealing or base coat stages, allow to dry, lightly sand area with 600 grit to remove dirt, reapply coat to the sanded area, and continue the process. However, if dirt is noticed during the clear coating application, you must complete the clear coat application and cut and polish after the clear coat is dry.
Orange Peel
This is a easy term to remember, because it is actually referring to the peel of an orange. The peel of an orange has a bumpy texture. Now if you look close at all paint jobs, even new from the factory, there is orange peel present. The only time there is not, is if the surface has been cut and polished (buffed) like a show car. However, it is the excessive orange peel that become the problem and becomes an undesirable finish to the customer.
When we were discussing spraying techniques and how the spray gun atomizes paint, we said the paint is broken into tiny drops so that it could be transferred from the cup to the car. When the drops are too big or too dry when they hit the panel being finished, the drops will not flow together and level out as they should. In order to reduce the orange peel to an acceptable amount is to find a way to make the paint drops smaller or a way to spray the paint wetter.
Before we suggest ways to fix the problem, lets look at a few of the things that could cause excessive orange peel. The more air pressure the more atomization (smaller drops) and the less air pressure the less atomization (bigger drops). Therefore, the problem could be that your air pressure is too low. Next, the closer to the panel the wetter the paint is going to be, the further away, the paint has more time to dry before landing on the panel being painted, resulting in dry spray. Therefore, another correction could be to get closer to the panel being sprayed. What else could cause the drops to dry too fast? If you are using a reducer that is too fast for the temperature that you are spraying could cause this as well. Never try to use a faster reducer thinking that you are going to speed up the process as it can lead to problems such as this. So make certain your air pressure is correct, work on spraying at the correct distance, and always mix the recommended products and you will reduce the chances of orange peel. For more information about gun settings visit lesson 9 – Gun Adjustments.
Demonstrating How To Remove Dirt – Level Orange Peel
Runs and Sags – I have always heard that a run is a painters signature. It probably will not work for the customer though. Runs and sags are basically the buildup of product, which causes it to run, or almost run, which would be a sag. I am pretty certain that there is not a painter out there that has never gotten a run. I know I have had some and it can really make a good day bad real fast. However, if the runs are not too bad you can usually repair them by sanding and polishing the area as described in the detailing module. So what causes runs? The obvious is spraying too close, too heavy, or going to slow. Other things that you may need to think about is flash times. Did you wait the recommended flash time between coats? This is something else that can lead to runs or sags.
To eliminate runs work on gun speed, distance, and always follow the recommendations from the product technical sheet and always use the correct reducer for the temperature.
Demonstration of Removing Run With Razor Blade
Dry
Video About Dry Spray
Dry spray is the opposite of runs. This is caused by being too far away, too much air pressure or wrong reducer. This will give it a rough or bumpy look. When you look at it the reflections look blurry, not that glossy mirror look. To prevent this problem make sure your gun setting are correct. Read the technical data sheet for the products you’re using for recommended reducers, air pressure, and other recommendations.
If it’s not too bad dry spray can usually be fixed by sanding and polishing. For more information to correct this problem visit the Gun Adjustments. Visit the detailing lesson for more information about how to sand and buff.
Sand Scratch Swelling
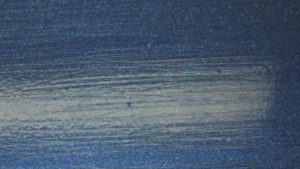 This is a condition which you can see the scratches in the bodywork. This is caused by using too course of sandpaper when finishing your body work, not properly priming and block sanding the repair area, or applying too much primer and not allowing it to properly dry. The first two reasons explain them self, but lets look at the third reason. It’s called hosing it on. Don’t try to put extra thick coats on thinking that it’s going to fill more, or rush the coats by not allowing flash times. This can lead to solvents being trapped in the primer. If you rush through a job, primer it, block, seal, paint, clear, all in a short period of time, you are trapping a lot of solvents in the material. It may look great when you done painting, but when the solvents start evaporating, the coatings shrink, which leave the scratches with inadequate primer to fill it.
To eliminate this problem, always make sure that your body work is ready for primer. Have body filler and surrounding areas sanded with 150 grit to eliminate all of the 36 and/or 80 grit scratches. Apply the coatings as recommended. If it recommends two medium wet coats then apply two medium wet coats….not four double-wet coats back to back with not flash time. More in NOT better in this situation.
Lifting
Lifting and Wrinkling Informational Video
This is a chemical reaction of the solvents softening the substrate coatings and causing them to lift. Years ago I used a paint called ACME that would lift very easy during base coat application. The cause of this was rushing the flash times or applying the base coat too thick. Once it lifted, it may require stripping to metal. Strong solvents like thinner on fresh paints also cause lifting. You should be extremely careful if you sand through the surface on fresh clear. For example, let’s say that you found an additional dent that needs to be repaired and repainted. The ring where the clear coat and base coat sanding through is very sensitive and may lift if re-sprayed. Using a sealer and spaying a light dry coat can help seal the surface and eliminate the lifting problem. So never spray wet with your first coats if lifting is a problem. You must also watch etch primer if you use that type of primer. If sprayed too wet, it may attach and lift the edges. Therefore, always spray etch primers in thin coats that are not wet.
To eliminate this problem, wait recommended flash times and always use the correct reducer. If you are working with fresh paint, use thin dry coats.
Striping – This is streaks or stripes that can been seen in metallic paint jobs. This is due to the metallic laying uneven due to improper gun settings or spraying techniques. For example, if the air pressure is too high, it will cause a figure 8 (heavy on top and bottom), which will result in stripes. Another reason that causes this is by spraying base coat too wet. This will allow the metallic to gather together, which will cause the stripes.
To eliminate this problem, always maintain your spray gun and assure that it’s spraying correctly. Spray base coat with a medium-wet coat to assure that it’s not sprayed to wet. Use correct overlap, recommended reducer and air pressure.
Mottling
Mottling Video
This is blotchy look caused from the metallics gathering together in spots rather than stripes. Again, this can be caused by applying metallic paints too wet, applying clear coat without proper base coat flash time. The clear can actually move the metallic around causing this problem. So the base may have been sprayed correctly, but cause the mottling during the clear coat process. So always allow proper flash time between base coat and clear coat.
To eliminate this problem, always maintain your spray gun and assure that it’s spraying correctly. Spray base coat with a medium-wet coat to assure that it’s not sprayed to wet. Use correct overlap and recommended reducer. And allow recommended flash times.
Solvent Popping
This is small holes or craters that appear in the surface. This is caused from solvent that was trapped in the coatings. As it finally evaporates, it left the void, or hole in it’s place. As with many of the paint defect, applying too much material too fast is the leading cause for this problem. It could also be due to the bake system, if it was set too hot.
To eliminate this problem, follow recommended film thickness and wait recommended flash time. Avoid overheating the surface during the bake time.
Fish Eyes
Video About Fisheye Eliminator
This is round circle looking spots on the surface. This is where the coating will not cover due to silicones. Have you every spilt oil on the ground and cleaned it. Once clean you spray it with water? Did you notice how the water beads up? Other examples of water beading up are: water in a frying pan, or on a freshly waxed car. With that in mind, let’s say that we wax a small circle the size of a dime on the hood of a car. If we run water over the car, the dime size spot will immediately dry as the water beads up around it. That is similar to what happens when getting fish eyes in a paint finish. The silicone will not allow the paint to stick in the small dots due to the silicone.
Silicone is in many car care products such as, wax, dressings, armor all, oil, and even in the environment from diesels and many other resources. The vehicle is going to have silicone contaminates when entering the shop. That is why it is important to make certain the surface is properly washed and cleaned. Proper cleaning will eliminate this problem. I have not had many problems with this, but it has appeared, even after cleaning the car. What I was able to do is to spray a light dry coat to seal the surface and wait additional flash time to allow it to dry good. Then continue spraying in a normal manner. Of course, if the fish eyes are too big or too many, this trick may not work.
To eliminate this problem, clean, clean, clean.
There are other problems that can arise, but this covers the most problems that you will have or that I have had. There are other problems that we may address later, but if you follow the cleaning steps as you have been instructed to do, you should not have many of the problems. In the website resources below, I have added a website that shows some excellent photos and explanations of these and many other defects.
Resources

- Stripping Paint To Metal
- Scraping Runs With Razor Blades
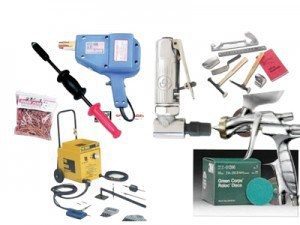
- www.CollisionBlast.com/3MDenibingSystem – 3Ms New Denibing System
- Paint Stripper – www.CollisionBlast.com/AircraftPaintStripper
- Measure Paint Thickness – www.CollisionBlast.com/PaintMilGauge
- Nib Block Tool – www.CollisionBlast.com/DenibBlock
- Razor Blades


 Paint Defects – Photos of paint defects

Read lesson 11 text watch the videos, and take a look of the different photos of paint defects.

Have you ever seen one of the problems mentioned in this lesson?
Strip To Metal
- Wash panel with soap and water
- Wipe with wax and grease remover
- Remove coating, DA with 36 followed by 80 grit, or use chemical striper, or media blast
- DA sand with 180 grit
- Apply 1-2 coats of epoxy
- If there are no waves or any other imperfections skip primer surfacer and sanding steps.
- Apply 2 coats of primer surfacer
- Allow to dry and apply guide coat.
- Final sand with 500 grit by hand or DA w/interface pad
- Scuff Wash
- Wash with soap and water
- Mask if needed.
- Wipe with wax and grease remover
- Tack with tack cloth
- Spray with primer sealer
- Spray Base
- Spray Clear
Module 11 Safety Quiz
Once you have complete the module content, take module 11 quiz below. This is a short quiz with only 10 questions. There is not a time limit set on this quiz so take your time. Find the correct answer if you do not know for sure. The objective of this quiz is to help you learn the information if you do not know the answer, not guessing. Good Luck!
password = simple
[…] If it is not, then using a machine to correct the paint will cause the paint to fracture (or cause Micro-checking). When this happens the only thing that can be done is […]