An awesome paint job on a Toyota Supra. (Photo credit: Wikipedia)
An auto paint shop may have different methods to mask molding to prevent bridging. This is a problem due to the molding fitting tight against or even touches the painted surface. The problem with this is that the clear coat may fill in the gap or crack between the molding and paint surface. In other words, the clear coat bridges over from the painted surface to the masking tape. When the paint is dried and the masking tape is removed, the clear coat will have a rough edge from the clear coat. A nightmare a paint shop may have after spraying the car in the paint booth is pulling a chunk of clear coat from the painted surface. If this happens, the surface may have to be sanded, re-painted, and cleared, which cost the body shop more auto body supplies. With the costs to paint a car, this is something you do not want to happen to you.
.
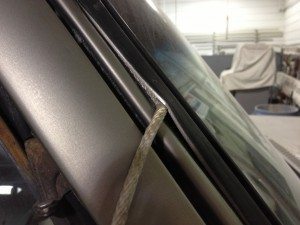
 There are several ways an auto paint shop can avoid this. If the glass molding is soft and flexible enough a small diameter rope can be used to shove under the molding. This will lift the edge of the molding up, which will allow the paint coating to flow underneath the molding. Once the paint is dry, remove the rope, which will allow the molding edge to lay back on top of the newly painted car paint job.
.
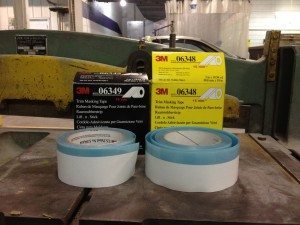
 There is also a special masking product, which has a hard plastic edge on one end and adhesive tape on the other end. First place the hard plastic edge underneath the edge of molding. Then fold the adhesive side over and stick to the glass. This will lift the edge of the molding up, which will allow paint coatings to flow underneath the moding. When the trim mask is removed, the edge of the molding will set back on top of the newly painted car paint job. This is nothing new to the auto paint shop, but it is a good product to consider is you have not been using it.
Sometimes the molding is too rigid and the molding is difficult to lift. In these cases, there is another method that can be used. When outline the molding with ¾ inch masking tape, leave about ⅛ inch of the molding exposed. Then mask the glass as you normally would using masking paper. Once completely masked, use ¼ inch fine line tape to go around the edge of the molding. This tape will cover the the molding edge and the masking tape that was used to outline the molding. It is important to apply the 1/4 inch tape last so it will be easy to pull off. Immediately after applying the last coat of clear coat, pull the ¼ inch tape from the molding. Care needs to be taken not to let the tape hit the fresh clear coat finish. This will produce a smooth transition instead of creating a hard edge if removed after the clear has dries. This will also eliminate the risk of pulling a chunk of clear from the painted surface. An auto paint shop probably already uses this method to reduce hard edges, but another tip for you to consider.
An awesome car paint job depends on how well you prepped the car. Improper masking is one of the easiest ways to notice a car has been painting. So take your time when prepping and masking to produce the perfect car paint job you are wishing for.
If you like this article, please subscribe to us at CollisionBlast.com If you have already subscribed, be a resource and share it with a friend.

 Judy Wilson says
March 18, 2016 at 10:10 pmThanks for telling me how to paint my car if the molding is too rigid. Using masking tape to cover the molding edge seems like a good idea. I’ll try applying 1/4 inch of tape to make it easy to pull off when I’m done. Thanks for the tips!