LESSON 1 – LESSON 2 – LESSON 3 – LESSON 4 – LESSON 5 – LESSON 6 – LESSON 7 – LESSON 8 – LESSON 9 – LESSON 10
Welcome to Auto Repair Estimating. These lessons are designed to provide you with the basics to Auto Estimating. I hope you enjoy the lesson. Donnie
Lesson 4 – The Necessary Parts of an Estimate
Gotta Know Your Nomenclature
“The discipline of writing something down is the first step towards making it happen.” ~Lee Iacocca
What This Chapter Covers:
This chapter covers all of the necessary information needed on an auto repair estimate, the names used to describe the different parts of a vehicle, the sequence to follow when inspecting a vehicle, and how to access and understand the estimating procedure pages.
Why This Is Important:
An estimator must know how to locate and record the necessary customer and vehicle information to ensure they are using the correct estimating guide information. The estimator must also know the names of the parts to record the correct parts. To work efficiently, the estimator needs to know what estimating sequence to follow and be able to access the estimating procedure pages if a question arises.
Topics Covered In This Chapter Include:
• Record Customer Information
• Record Vehicle Make and Model
• Record and Decode VIN
• Record Production Date
• Record Vehicle Mileage
• Record Date of Accident
• Locate and Record Paint Code
• Record Insurance Information
• Nomenclature—The Parts of a Vehicle
• Estimating Sequence When Inspecting Damage
• Understanding The Procedure Pages
• OEM-Recommended Procedures
This chapter has been aligned with the following 2013 NATEF/ASE tasks:
•B:1 Determine and record customer/vehicle owner information. HP-I
•B:2 Identify and record vehicle identification number (VIN) information, including nation of origin, make, model, restraint system, body type, production date, engine type, and assembly plant. HP-I
•B:3 Identify and record vehicle options, including trim level, paint code,
transmission, accessories, and modifications. HP-I
•B:5 Apply appropriate estimating and parts nomenclature (terminology). HP-I
•B:6 Determine and apply appropriate estimating sequence. HP-I
•B:7 Utilize estimating guide procedure pages. HP-I
•B:8 Apply estimating guide footnotes and headnotes as needed. HP-I
The last thing you want is to be delayed by needing to speak to the owner before you can continue the repairs only to discover that you cannot get in touch with them. Perhaps they have gone on vacation and the only contact information the estimator recorded was their home phone number. You will not have a happy customer when they return expecting their vehicle to be ready.
Vehicle Information
You will also need the vehicle information—make, model, and style. Be certain to record the VIN (vehicle identification number). This may be used to determine the correct parts to order and have many other uses as well. The VIN can actually tell you quite a lot about the vehicle. Record the mileage, license plate number, and the date. This is all important information to have for future purposes.
Make and Model
Record the make and model of the vehicle. Is it a coupe, sedan, etc.? You will also want to record any packages that the vehicle is equipped with.
Decoding The VIN
This number tells a lot about the vehicle. There are 17 characters in a VIN, and each one means something different. The VIN will vary depending on the manufacturer, but the first digit will let us know where the vehicle was made. The 10th digit will always let us know the model year.
To determine what all of the characters stand for, you can look in the P-Pages, which will help us decode the vehicle. If using a computer system, it will probably decode the VIN after entering it into the system. With CCC One, you must put in the VIN to complete the estimate. Once the VIN is put into the computer correctly, CCC will decode the VIN for us.
If you recorded the VIN incorrectly, you will not be able to proceed. So it is important to record it properly. Writing it down correctly will also save you another trip to the car to determine if you were wrong on one of the numbers.
The correct VIN will also help you when ordering parts to ensure you are ordering the correct parts. Misordered parts are an ongoing issue, which delay repairs, increase recycle times, and may break a promise date of completion to the customer.
There is a VIN decoding resource on the website.
Production Date
The VIN will provide the year the car was made, but when ordering parts or for some recommended procedures the production date may be needed. The manufacturer could have tweaked a part slightly or changed the recommended procedure or a certain task.
Vehicle Mileage
Recording the mileage is easy to overlook when writing an estimate, but it is important to get the mileage for several different reasons. I always like to record the mileage for documentation. I have heard of customers claiming that their vehicle was driven around town using all of their gas. It may be necessary to test-drive a vehicle before returning it to the customer, but with the mileage recorded before repairs were made you will have documentation of actual miles the car was driven while in the shop for repairs and assure the customer that your shop does not participate in this type of activity. Always document everything, as it may protect you at a later time.
Date Of Estimate
You will also need to record the date the vehicle was estimated. Normally, an estimate is only good for one month. With price changes, the estimate may become invalid with incorrect prices, which will need to be adjusted. It is also important to record the date the estimate was written because the condition of the vehicle can change. For example, when you wrote the estimate, the vehicle may have had surface rust. Several months later, the rust may affect a panel, which will need to be replaced or additional labor required to repair the damage.
Prior Damage
Prior damage is damage that was present before the accident occurred. This is important to discover, as insurance will not pay for prior damage. Prior damage may be on adjacent panels, or it may be on the damaged panel that you are estimating. For example, if a vehicle has a small dent on the front of the right front fender with prior damage on the back of the right front fender, insurance will not pay for the time to repair the damage to the rear of the fender. The damage will probably need to be repaired, but it will be at the cost of the customer, not the insurance company.
Another reason to document prior damage is to have documentation that the damage was there before the vehicle was repaired. This will eliminate the customer claiming that the damage occurred while the vehicle was in the shop being repaired.
The customer may not have even noticed prior damage. Pointing it out to them not only covers the shop but also will be an up-sell to repair the damage as a customer pay job. Don’t miss these opportunities to capture this additional revenue. Whether the customer wants to pay for the prior damage or not, they will know the damage is there and will not assume it happened while in the shop when their vehicle is returned to them.
Finding The Paint Code
Paint codes can be in various locations depending on make and model. The P-Pages or your estimating system will usually give you the location of the paint code. You will need to know if the car has clear coat, tri-coat, or in rare cases quad coats. This will all change the cost of paint labor and paint material costs.
Paint companies also have software to help determine the paint code. PPG has an online paint code finder at www.PPGPaintIt.com
Insurance Claim Information
Most accidents will involve an insurance claim. If so, record the name of the insurance company, their number, claim number if one has been generated, and the name and number of the insurance adjuster.
This information should be recorded, as the estimator is responsible for communicating with the adjuster to arrange for the damage to be repaired.
A Communication Tool
There are many parts to an auto repair estimate. The main thing to remember is that the estimate needs all the information to provide a good communication tool that will show the big picture. The more information you have on it, the clearer the big picture will look. The more customer information, vehicle information, insurance information, and facts about the accident you collect, the better communications you will have throughout the entire process. A little extra work on the front side will save you a lot of time and headaches in the long run.
An estimator needs to be able to identify parts and to know what the parts are called. This will help with the inspection and also help communicate the damage to customers, the insurance company, part suppliers, shop managers, and technicians.
Below are a few photos of nonstructural and structural parts, but many individual parts are not listed. These parts will be listed individually in the estimating guide or estimating system.
You can also study part names by each make and model by visiting http://www.parts.com and selecting the vehicle you want to look up. This will give you a breakdown of the parts along with their names.
Non-Structural Parts
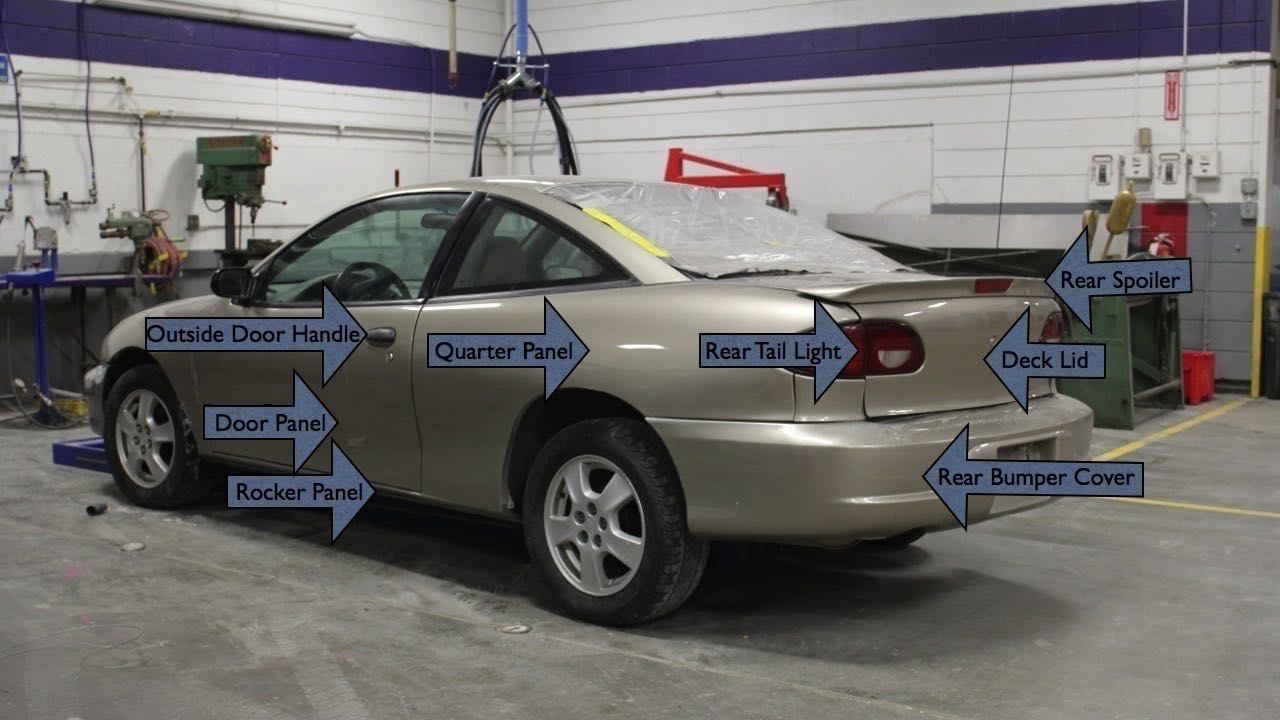
This photo shows:
•Rear Bumper Cover
•Deck Lid aka Trunk or Luggage Lid
•Quarter Panel
•Door Panel
•Rear Taillight
•Rear Spoiler
•Rocker Panel
•Outside Door Handle
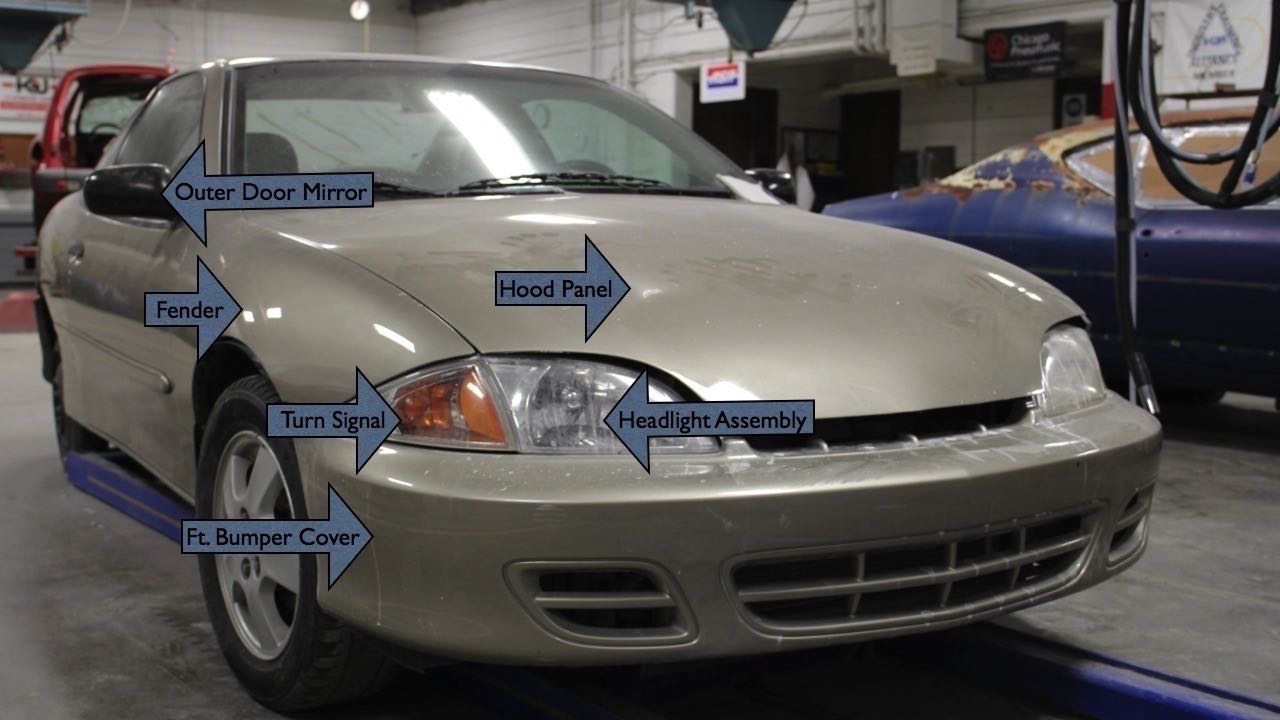
This photo shows:
•Front Bumper Cover
•Headlight Assembly
•Turn Signal
•Hood Panel
•Fender
•Outer Door Mirror
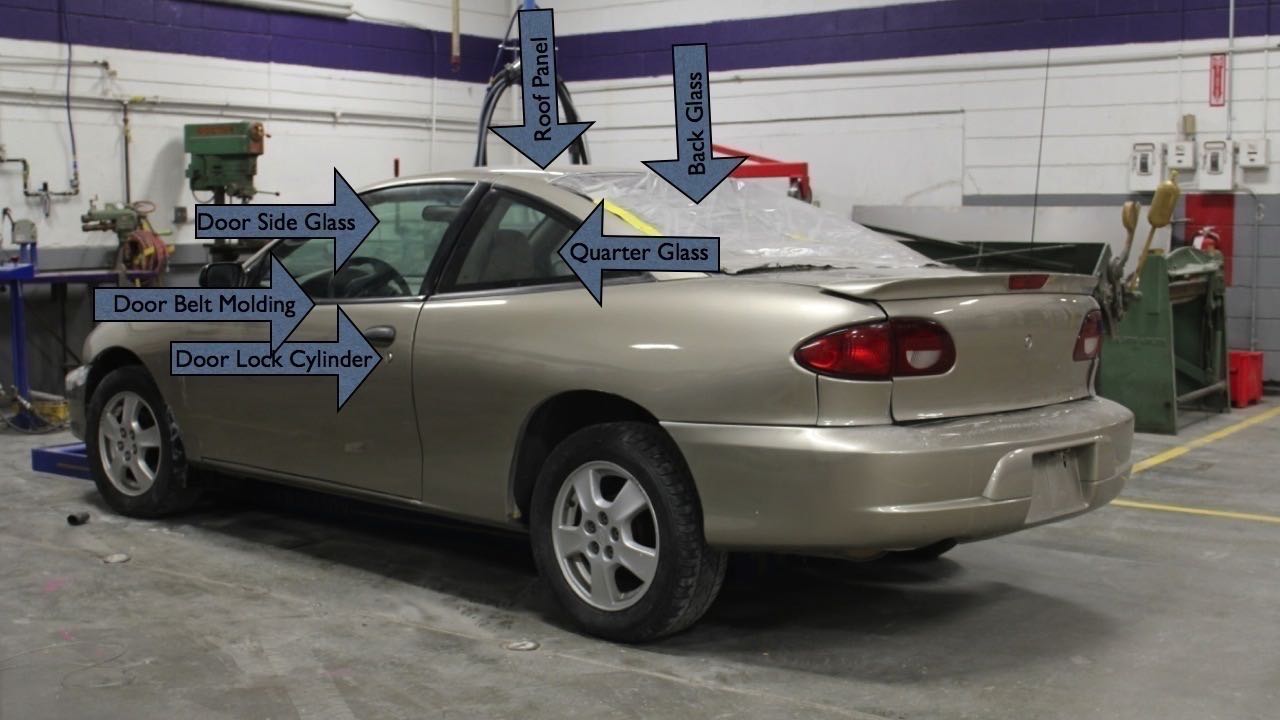
This photo shows:
•Quarter Glass
•Back Glass
•Roof Panel
•Door Side Glass
•Door Belt Molding
•Door Lock Cylinder
Structural Parts
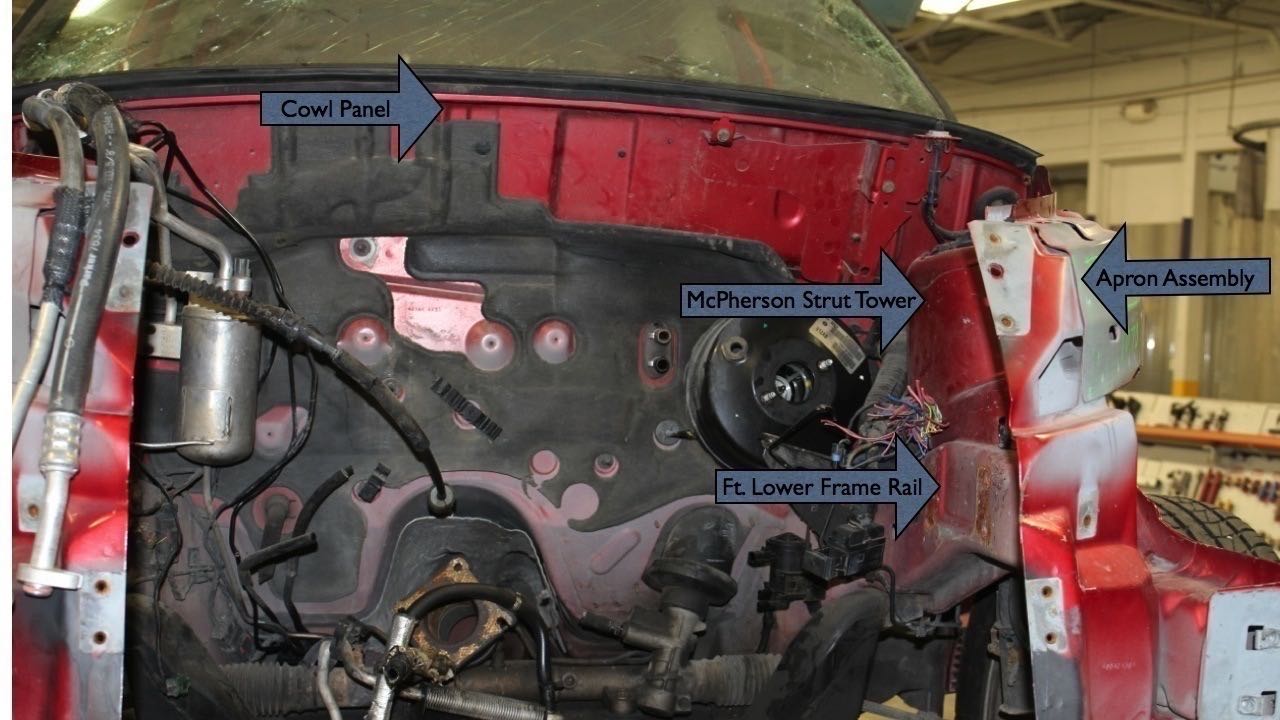
This photo shows:
•Cowl Panel
•McPherson Strut Tower
•Front Lower Rail
•Apron Assembly
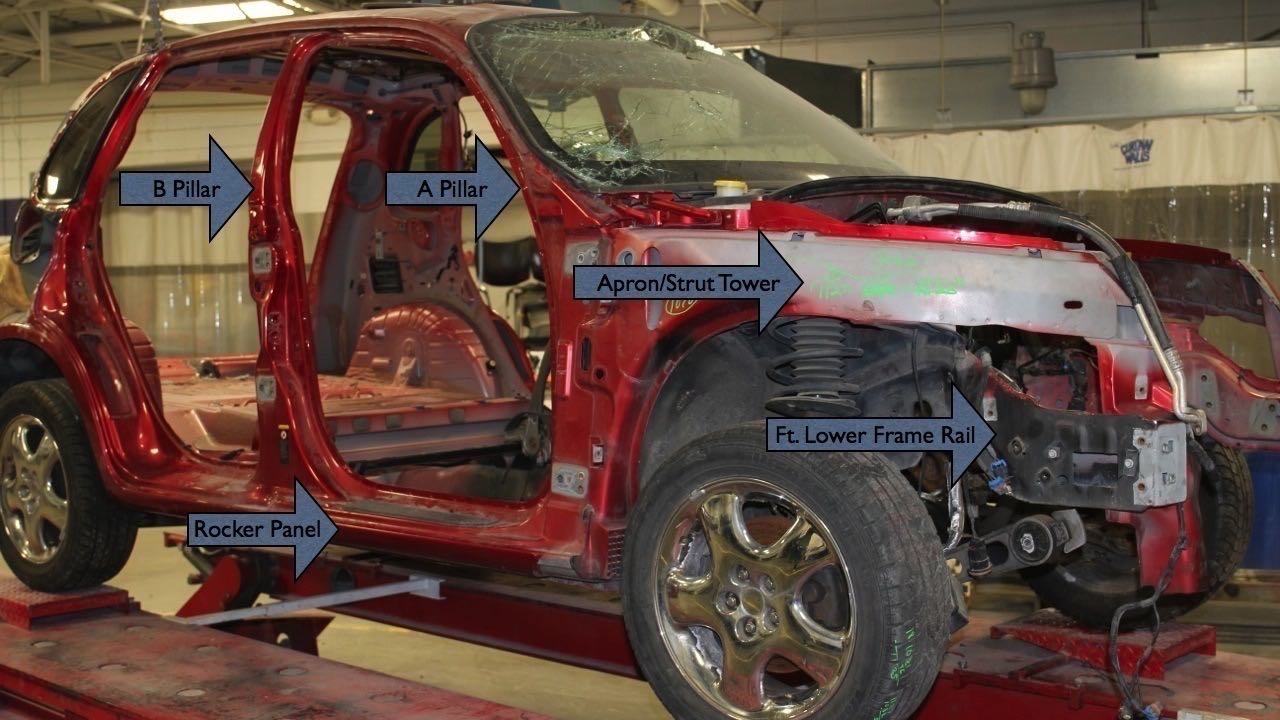
This photo shows:
•Front Lower Rail
•Apron/Strut Assembly
•A Pillar
•B Pillar
•Rocker Panel
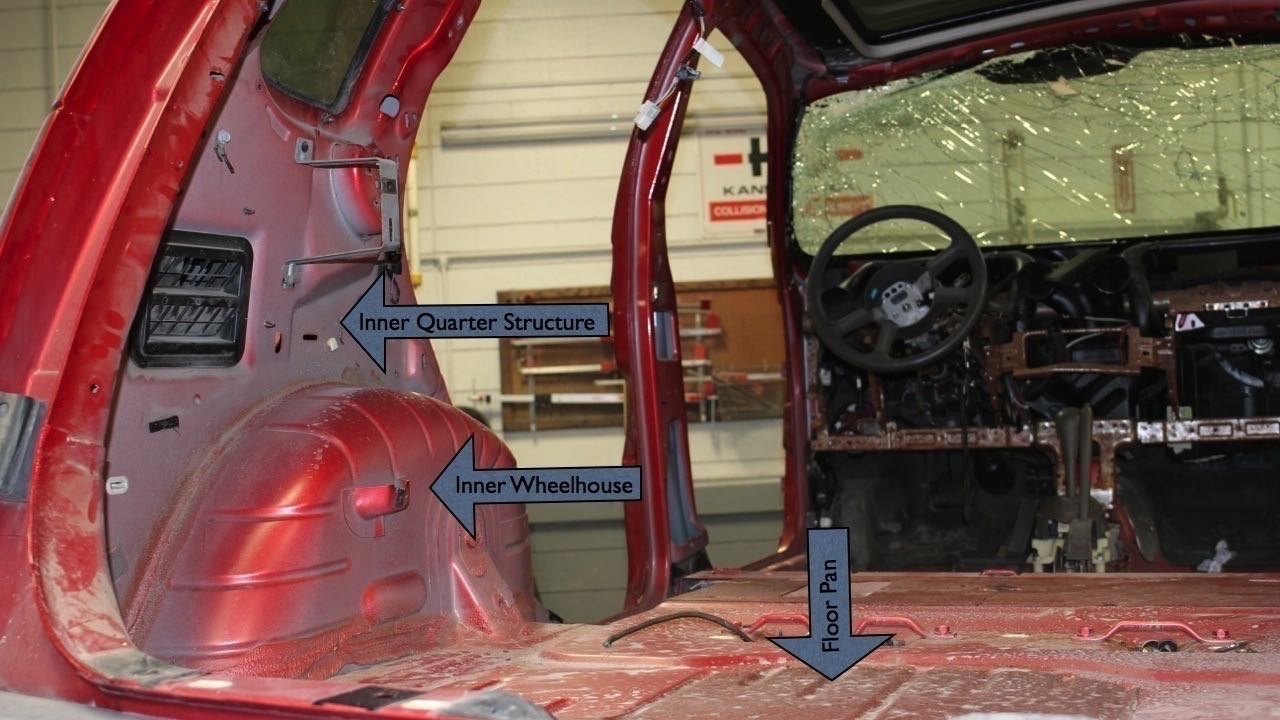
This photo shows:
• Inner Quarter Structure
• Inner Wheelhouse
• Floor Pan
There are obviously many more parts than listed. Read the parts description in the estimating guides of the different makes and models to become more familiar with them or visit the website I listed above.
Be aware that some parts in the estimating guide may be called something different in the body shop. I will list a few of the parts with different names below.
• A Pillar—Windshield Pillar
• Replacement Outer Door Panel—Door Skin
• Deck Lid—Trunk Lid—Luggage Lid
• Center Body Pillar—B Pillar
Estimating Sequence When Inspecting Damage
To become efficient at writing estimates, the estimator needs to follow the same sequence as the estimating guide or computer system. Most guides and systems start at the front of the vehicle and move toward the back. The sequence also starts on the outside of each group of parts and moves toward the inside.
For instance, let’s say we have a damaged front bumper cover and hood. First, inspect the bumper cover and determine if the bumper cover needs to be repaired or replaced. Before moving to the next part group, let’s make sure we have everything in the bumper group. Moving inward on the bumper group, we may have an impact absorber, reinforcement bar, broken clips, etc. Determine if any parts in the bumper group need to be repaired or replaced. Next, move to the next panel, moving toward the back of the car. Looking at the part groups in the CCC One, the next part group would be the grille, front lamps, radiator support, etc.
Notice in the photo of CCC One below the sequence of the part groups. When the estimator clicks on one of the part groups, the system will show all the parts for that specific part group. This system will show diagrams of the parts, prices, and labor times.
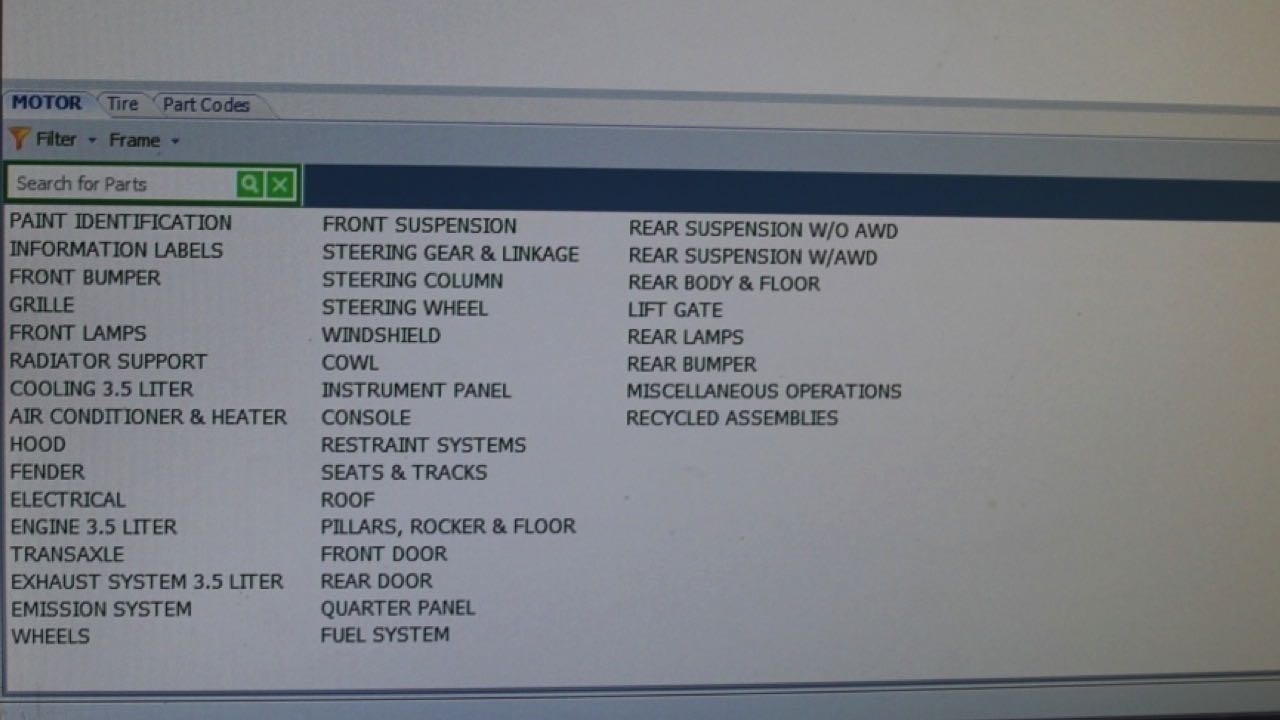 Notice in the photo how the sequence starts with the front bumper and ends with the rear bumper.
The P-Pages included in your estimating guide are very helpful and should be viewed regularly. You will find abbreviations used, definitions, information about labor notes, what each procedure includes and what it does not include, and much more.
Please note that each estimating guide or system will vary on procedures and terms. Check the P-Pages in the guide or system you use to ensure correct information.
In the resource section, I have an online resource for Mitchell’s and Motors P-Pages.
Common Terms
Shown below are a few of the most common terms you will need to memorize and be familiar with.
Remove and Install (R&I): R&I is the process of removing a part and installing the same part. For instance, a door may need to be removed to gain access to the area being repaired. This may only include unbolting the hinges and unplugging the wire harness. If the door is being replaced, the door panel, handle, glass, regulator, and all of the hardware will need to be transferred from the old door to the new door. R&I will take less time than replacing the door.
Remove and Replace (R&R): R&R is the process of removing a part and replacing the part with another part. This will require all of the hardware to be transferred to the new part. R&R will require more time than R&I.
Overhaul (O/H): O/H is the process of completely tearing an assembly apart and putting it back together. An example of this would be a bumper assembly that is O/H. This would include removing the bumper assembly from the vehicle, tearing the assembly apart, putting the assembly back together, and then installing. The estimating guide will provide this option for parts that may be O/H.
Disconnect and Reconnect (D&R): D&R is the process of disconnecting a part and later reconnecting it. For example, most repairs require the battery to be disconnected to perform repairs. When the work has been completed, the battery can be reconnected. This is different and takes less time than removing the battery.
Overlap: If adjoining parts are being replaced, there is an overlap in both operations. A deduction must be made from the total operations. For example, if a radiator support is being replaced, a overlap deduction may be deducted if the bumper is already removed.
Frame Setup: This procedure involves setting the vehicle and clamping onto the frame machine and preparing the vehicle for pulling.
Symbols
¶—PART FOOTNOTE: Special part situations or requirements are denoted with a footnote symbol. The explanation follows as closely as possible to the part referenced.
#—LABOR FOOTNOTE: Special labor situations or requirements are denoted with a different footnote symbol. The explanation follows as closely as possible to the time referenced.
m—A designation that appears in a separate text column to the left of the labor time column to identify components for which R&I or R&R is commonly considered to be a mechanical operation when performed in a collision repair environment.
s—A designation that appears in a separate text column to the left of the labor time column to identify unibody structural components—those that support the weight of the vehicle and absorb the energy of the impact as well as road shock.
d—DISCONTINUED PART – When an OEM part is no longer available.
(P)—PAINT TO MATCH: A designation that appears immediately after a part description or application to identify components that must be painted to match the exterior/interior color of the vehicle.
(R)—REMANUFACTURED PART
P-Pages
• The P-Pages are an excellent source to determine:
• What is included in an operation and what is not
• Definitions used in the estimating process
• Terms used in the industry
• Symbols used in the estimating guide
• Part identification
OEM-Recommended Procedures
I have sprinkled throughout this book the importance of the estimating P-Pages and the recommended procedures. Don’t confuse the two. When talking about recommended procedures, I am talking about the OEM-recommended procedures, which are specific recommended procedures for each make and model of vehicle being worked on.
The recommended procedures are very important to determine how specific operations should be performed, especially with newer vehicles having different metals and composites. The days of uniform procedures are gone. Every make and model may have different procedures for each operation.
Where Do I Find The Recommended Procedures?
CCC One integrated many of the recommended procedures into their estimating system, which I have found very useful. When the estimate is being generated in the commuter system, the recommended procedures can be pulled up. Other computer estimating systems may offer the same thing.
If the estimating system does not have OEM-recommended procedures integrated, then there are several other ways to access the information.
Collision Repair Guides can be purchased for specific makes and models. They are not cheap and having a guide for every make and model would be quite expensive.
Databases such as Alldata Collision Connect is an online paid service for an annual fee. I will include information about Alldata in the resource area.
Some websites have OEM providers, which will allow you to reference a specific make and model. Much of the information is free, but some are paid. You can also purchase information by the day or week, which is fairly inexpensive. To learn more about this, visit www.oemonestop.com
[…] 1 – LESSON 2 – LESSON 3 – LESSON 4 – LESSON 5 – LESSON 6 – LESSON 7 – LESSON 8 – LESSON 9 – […]