These lessons are now open to help collision repair students learn from home. I am lifting the Patron fee to access this content during this time, as many schools are closed. However, I do appreciate your support and hope my Patrons continue to support this website and training.
If you would like to help and support this website, then I would greatly appreciate it. For more information visit. www.Patreon.com/CarAddictGarage
Click Button Below For Lesson
I hope you enjoy this training module. Let me know if you have any questions, or suggestions you may have to make this training module a better learning experience for you. Donnie
Lesson 10 – Paints and Clears
In this lesson I am not going to spend time on the history of paint, as there is not much of it around. The first car I painted was with lacquer and the second was acrylic enamel. It was not long into my career that the industry changed to the base coat/clear coat urethane systems, which are much better and easier to use in my opinion. The industry is currently making another transition to waterborne base coats; however, we’re going to stick to the solvents in this lesson.
This page is the full lesson, which includes text content, videos and resources. I also broke it down to only the videos and resources. Just click the button below if you prefer to view only the videos or resources. Note: some browsers and mobile devices may not play videos below…but they should work on the videos page. If you are still having problems viewing videos, then you can watch the playlist on YouTube.
Video Overview
This video is part of an ASE video series designed more for a body shop than the DIY. But it is a good overview of safety for auto body and paint.
I do not currently have a video overview for this lesson. There are demonstration videos below.
Determining The Paint Color
Before we start painting a car, we must know the paint code. Every car has a paint code from the factory. However, the code may have variations, which may result in additional formulas made by the paint companies. For instance, the paint code may be E9, but there could be several different shades to choose from.
Where Is The Paint Code Located?
That is a good question. Some of them can be difficult to find. I wish all car makers were as simple as Ford, which places them all on the drivers side door or striker area. I think DuPont or one of the paint companies uses the VIN number. With PPG, you must find the OEM paint code. Once you locate it, you can look at the paint book to find the correct PPG number. Then find the various deck with the PPG paint code. A variance deck is all the possible variances for each color. If the particular paint code has four variances, take the cards outside or use a color corrected sun gun to determine which variant is the closest match. Then enter the paint code and variant into the computer and it will provide a paint code for you. Then simply add the amount of each toner that is specified. If you do not have a mixing bank, you will just have to get the paint code and take it to your local auto paint store. If there is a gas lid or another part that you can take with you, that will help them select the best variant. If not, they will usually mix the prime color. That is the first original color.
Don’t they use the same color of paint….Why all the variances?
I don’t know all the answers to this, but paint can vary from one plant to another. Another thing that I found interesting is that they paint different colors often. I always thought they would paint x amount of cars white, and x amount blue, etc. However, they do not do that. One may be red and the next one white. I don’t know this for sure, just a guess is that they paint by demand. I don’t know, it seems like that could be streamlined a little. I know we cannot do like Henry Ford did with the Model A and paint them all black. Well, with this in mind, if you paint a red car, then the system does a clean out rinse cycle, then paint a white car….could you see a potential problem? If there was just a hint of red, it may have a slight tint of red to it. This is not going to be noticeable on the complete car, but when you try to butt match it, you will see that there is a difference. Again, I am no manufacturing expert, just what I have been told and a few guesses. Anyway, for whatever reason, when several painters call PPG complaining about the same color with matching problems, PPG or the paint company will formulate new formulas to match these colors. I know, that is a lot of work, but the good thing is the paint companies do all of that for us; we just need to select the best color and mix the paint.
Single Stage Paint
Single stage is still used today, but most cars from the factory have clear coat applied on them. So unless you are painting a complete, restoring your ride, or cutting costs, you will probably be using the base coat system. Single stage paint is paint that does not require clear coat. It has all the binders and chemicals to provide UV protection mixed into the single stage paint. Now, there is a method of mixing clear with base coat to create a single stage paint to spray your door jambs, engine compartment, and other areas that will not be exposed to the sun. However, if you are painting the outside of the car, you will need to purchase single stage urethane paint that is designed to be sprayed on the outside of the car. I’ll add more information about single stage paint in additional resources, but we’re going to move on to base coat in this module, as that is probably what you will be working with.
Base Coat
Base coat is the pigment or the color that we see on the car. It is made from three different materials. (1) Pigment, which is the color…may be a dry material. (2) Binders, is the material that binds the pigment and holds it together. It’s like a clear glue. (3) Solvents, this is what reduces the material into a liquid form that has the viscosity to spray with a spray gun. That is what makes paint itself. Now there are additional materials added to give different looks and that help dry the paint. Paint may or may not have catalyst, flex additives, or retarders to slow down the dry time. With this in mind, some colors may cover more or less than others. Or certain colors may have more binders and solvents, which causes the color not to cover as well as other colors. Therefore, it is important to understand this as two coats of one color may not be equal to a different color. If the technical data sheet says to spray 2 coats or until hiding, do not spray two coats and call it good. Make sure that it really has full hiding. On the other hand, if it has good hiding, then stop….that is all you need. Remember, the only thing that base coat is for is to cover what is underneath. Do not try to spray base coat wet and glossy…base coat sprays dull, that is what it’s supposed to do. If you apply to wet you may trap solvents and cause solvent popping as we discussed in an earlier module or cause metallics to become uneven and cause stripes or mottling in the paint.
Primer Sealer
Base and Primer Sealer Instructional Video
This is an ASE video from another video series, but it does covers paint and undercoatings.
What is Paint
Before we discuss undercoat, let’s talk about paint. Paint consists of three things; pigments, which is the color, solvents to make the pigments a liquid form so it can be sprayed, and binders, which acts like a glue to hold it all together. There are also additives like alu
inum flakes to make metallic colors or mica to make pearlescent colors. Each color differs with the amount of pigment it has. So some paints are going to cover better than others. The less pigment in a color results in a more translucent color.
Color Matching Starts with the Undercoat

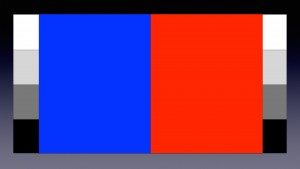
Getting a correct color match begins with the undercoat due to many colors are translucent. This basically means that you can see through the colors. Therefore, the color is going to be different shades depending of the shade of the undercoat. For example, a darker undercoat is going to produce a darker finished color and a lighter undercoat is going to produce a lighter finished color.
Hiding
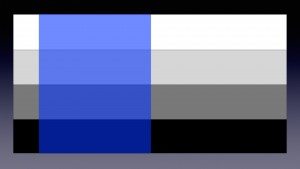
Traditionally undercoating was designed to help achieve color hiding faster. For example, one coat of high pigment undercoating will reduce the number of coats of base coat needed to achieve full hiding. However, with many of the more translucent colors, the undercoat actually plays a part in the overall color match so determining the correct shade of undercoat is crucial.
What Can Be Used For Undercoat
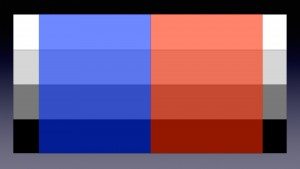 Depending on the product system being used a primer sealer, primer surfacer, or even base coat can be used to provide the correct gray shade undercoat.
Primer Sealer
Primer sealer is a primer that is not sanded after applied. Once the surface has been prepped, masked, and ready to spray, then one to two coats of primer sealer can be applied to the surface. The number of coats may vary depending on the brand of material you’re using. Once applied allow the primer sealer to flash off, usually ten to thirty minutes, then apply base coat on top of the primer sealer.
It’s important to read the technical data sheet before using any paint materials to determine what their recommendations are for number of coats, flash time, spray gun settings, etc. These may vary depending on the specific product being used.
Primer Surfacer
Some paint companies also make primer surfacer with the correct gray scale or that can be mixed together to get the correct shade. Some primer surfacers can be tinted with color to produce the correct gray scale. However, primer surfacer must be sanded. If this method is used there must not be an sanded through areas, as this will provide an inconsistent undercoat shade. If this method is being used the surface is sprayed with primer surfacer, block sanded, final sanded, then it can be masked off. Once masked off base coat can be applied straight over the primer surfacer.
Not all primer surfacers can be tinted. So it’s important to read the technical data sheet for the material you’re using to determine if tinting is recommended. Also for the number of coats, flash time, spray gun set-up, etc.
Base Coat
Base coat can also be mixed to achieve the correct gray scale. Once the surface has been prepped, masked, and ready to spray, apply the correct gray scale base coat. Allow to flash, then apply base coat top coat. This can be helpful with some brands of waterborne paint. I have a PPG video below to help explain this process better.
How to Determine Which Shade of Undercoat to Use
When looking up a paint code the manufacture should recommend the undercoating. Generally a light color will require a light undercoat and a darker color will require a darker undercoating. However, this may vary to different paint companies and the specific products used. It’s important to read the technical data sheet to determine what is recommended for the specific products being used.
Video – PPG Explains Using Base Coat For Translucent Colors
Metallics
Metallic is metal or aluminum that is ground into very small pieces. This metal is then added to the paint color to achieve the metallic look. With most metallics, more binder must be used to achieve the desired result. Not enough binder will result in the metallic being covered up and buried in the paint. With added binders, you are going to have less hiding. That is why metallics are always a bigger concern when it comes to full hiding.
Metallics also have other concerns to consider as well. It is very important to use correct gun settings and reducers for color match reasons. First, lets look at air pressure. If your air pressure is way to high, you are going to have a lot of overspray. As the overspray finally settles on the surface, the metallic is going to stand up, which means all the metallic is going to be on top. With most colors, if you see more of the metallic than you do on the adjacent panel, what do you think it is going to look like? It’s going to look lighter, right? Because you will see more of the metal color. If your pressure is too low it will cause the metallic to be saturated and become buried in the paint. If you see more color than the metallic, the color is probably going to look darker than the original color. The same is true with reducer. Fast reducer will dry too fast, which will not allow the metallic to settle, causing the color to be lighter. Thinner that is too slow will allow the metallic to settle too much which will result in the color being darker. If this is confusing, don’t worry about it. It will all come with time. I just wanted to give you a basic understanding. We’ll talk about blending below, which will allow us to make invisible repairs without having to be dead-on with the color match.
Pearls
Pearl or pearlescents, and even referred to as mica is made of very finely ground minerals. Pearls provide some of the shifting colors that change with light and the angles you look at it. Pearls are in many color codes from the factory and a pearl with clear base may be used for the tri-coat in many OEM colors. Custom paint jobs, non-OEM, can also be achieved using pearls. Kustom Shop and House of Kolor are two paint companies that specialize in custom non-OEM colors and products.
Tri-Coat
Tri-coat is a mid coat that is used to tint the color underneath it. It will not cover the base coat as it is very translucent. In other words, tri-coats are a base clear with a hint of color or pearls in them. Similar to a candy color. It is important to use a test panel to determine what the best match will be. Spray the base coat as you normally would on the spray-out card. Then spray one coat of the mid-coat, mask a strip off of the card and spray another coat, mask a strip, etc. What you will end up with is a small panel with 1, 2, 3, coats of mid-coat. Now clear coat the spray out card. Since mid-coat will never achieve full hiding, it will change the tint of the card with every coat of mid-coat that is applied. So which color matches the car better, base with 1, 2, or 3 coats? Then when you paint the car, you will know how many coats of mid-coat to apply to achieve the desired color.
This is hard to explain in words, but here is a video that will give you a visual understanding of how tri-coats/candys work.
Clear Coat
Clear coat is just that, a coat that is clear. The purpose of clear is to protect and provide gloss. Therefore, you need to be concerned with the mil thickness. If you do not spray enough clear onto the car, it may become weak and start to peel. Delaminating is a problem that you do not want as all the clear must be taken off to repair and repaint the car if this happens. It may take a while for this to happen, it’s not going to happen over night, but this is something we do not want to happen today or several years from now. Clear protects the paint, provides UV protection, and provides a glossy finish. That is the purpose of clear coat.
Blending
Blending is a process of taking the new paint color and transitioning it into the original paint color. It’s much like fading from one color to another without being able to tell the color ever changed. It fools the eye into believing that it’s a perfect match, when it may not be. I have a video and blog post below that will better explain the blending process. There are many colors that will not match if not blended. There are too many variables. A few are: the way metallic lays when being sprayed, air pressure, temp and humidity, fading of the old paint, what plant the car was built and painted at, and the list goes on and on. The point is that it is important to learn how to blend if you want to have invisible repairs.
Below is a video demonstrating the blending process. Please note, I do a few extra steps that may not be needed when blending. I am demonstrating how to blend, but also how to fade one color to another color as a custom effect.
Why Blend Paint?
How To Blend Paint and Fade Colors
Mixing Paint
All refinish products have a mixing ratio. This is how many part of the products mix with catalyst and or reducer. For example, you may see 4:1:1 Let’s say this is a clear coat that has this mixing ration. The ration would be 4 parts clear coat, to 1 part catalyst, to 1 part reducer. If you using ounces, this would be 4 ounces to 1 part catalyst to 1 part reducer.
This is just an example, there are many different ratios used in paint materials. Some paint lines may use percentages. For example, a product may say to reduce the paint 100%. In parts, this would be 1:1. Equal parts of paint and reducer would be used in this example.
Paint Mixing Demonstration
Spraying Base Coat, Tri-Coat, and Clear Coat Demonstration
Lesson Resources
Note: There are many different brands of paint materials to use. In order to achieve color match you will need to visit your local auto paint store. Be sure to ask for the technical sheets for each products that you use.
 Product Information
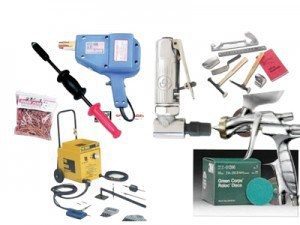
- Primer Sealer – This is House of Kolor Direct to Metal (DTM) that can be used as surfacer or sealer depending on how it’s mixed. It is an epoxy primer.
- Base Coat – House of Kolor Base Coats.
- Metallic Colors – House of Kolor Metallics
- Pearls – House of Kolor Pearls
- Kandys or Tri-Coat – House of Kolor Kandy
- Clear Coat – House of Kolor Clear Coat
- Blending or Mid Coat Clear – House of Kolor Intercept Clear
 Technical Data Sheets
- www.CollisionBlast.com/HOKPrimerTDS – Primer Sealer/Surfacer
- www.CollisionBlast.com/HOKBaseTDS – Base Coat
- www.CollisionBlast.com/HOKMetallicTDS – Metallics
- www.CollisionBlast.com/HOKPearlTDS – Pearls
- www.CollisionBlast.com/HOKKandyTDS – Kandy
- www.CollisionBlast.com/HOKClearTDS – Clear Coat
- www.CollisionBlast.com/HOKIntercoatTDS – Intercoat Clear
 Websites
- www.CollisionBlast.com/AutomotiveTouchUp – This website you can look up color codes for different makes and models.
 Training Activity
First practice finding your paint code. I know that you may not have a paint mixing system as demonstrated in one of the videos, but just become familiar with it. I have also included a website that can help you determine the paint code of a car. On this website you can add the year, make and model and it will list the colors for that car. You may consider visiting a body shop and asking if you can see their paint mixing system. If you don’t know a body shop owner you may try approaching them to tell them that you are writing a research paper over paints. Most shops like to support education, and would be glad to give you a tour. Next, if you have the materials and place to spray, continue working on the panels that you have been working on. Try spraying the sealer and paint. Then put a scratch in the paint so you can repair and blend the panel as in the video in this lesson.
 Step-By-Step – Seal, Paint, Blend, Clear
- The part has been prepped, primed, blocked, final sanded, and masked. Now the spraying process.
- Clean the surface to be painted with wax and grease remover.
- Tack surface, including surrounding masking paper, with a tack cloth.
- Read primer sealer technical data sheet.
- Mix primer sealer – If blending within a panel, only seal the repair area to help achieve hiding. Use a shade of sealer that is a close shade to the paint being sprayed.
- Adjust paint gun setting.
- Spray sealer on the repair area with the recommended number of coats. (usually 1-2 coats)
- Allow to dry recommended amount of time.
- Read base coat (color) technical data sheet.
- Mix base coat – If blending only mix enough to spray the repair area, not the entire panel.
- Spray the repair area with paint and allow to flash.
- Spray a second that extends past the first coat a few inches.
- Repeat painting steps until full hiding is achieved. (2 coat are good enough sometimes, but not every time.)
- Note: the remaining steps are when using PPG paint. Other paint may vary.
- Reduce base clear 1:1
- Add reduced paint and reduced base clear 1:1
- Spray another coat with this new mixture. Extend past your previous painted area 6 to 10 inches. Slightly arc the gun on the end of the paint pass. Be careful to limit this as heavy arching will cause the metallic to land differently, which may cause a halo effect.
- Allow paint to flash recommended time.
- Read clear coat technical data sheet.
- Mix enough clear coat to clear the entire panel the recommended number of coats.
- Spray a full-wet coat of clear on the entire panel and allow to flash.
- Spray second coat of clear. Most recommendation require 2-3 coats.
Paint and Clears Quiz
Lesson 10 Quiz
Now test your knowledge. There is not a time limit set on this quiz so take your time. Find the correct answer if you do not know for sure. The objective of this quiz is to help you learn the information if you do not know the answer, not guessing. Good Luck!
Paints and Clears Quiz – Password (simple)
Copyright 2011 CollisionBlast.com